

25The prerequisite: give the scene some time
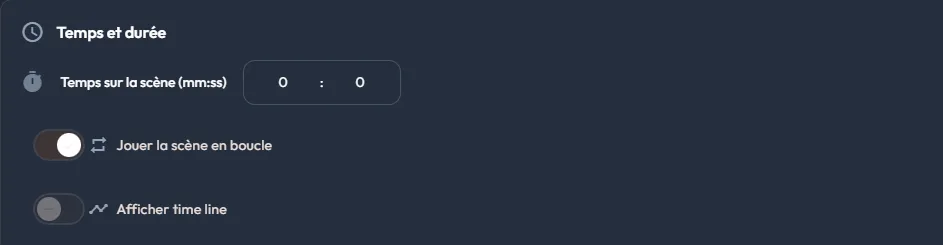
A scene built on a 360 image lasts zero seconds by default, which means no limit: the visitor stays as long as they like. This is not a flaw to be fixed. The duration is set in "Options de la scène" (scene options), "Général" tab, "Temps et durée" (time and duration) block, and this section explains when it is needed.
When zero seconds is enough
If every element of your scene must be present from start to finish, leave the duration at zero: points of interest to click, navigation arrows, an information sheet available on demand. An unlimited scene with "Au clic" (on click) events works as it is, there is nothing to set.
When a duration is required
Three needs call for a duration, and the second is easily forgotten:
- Opening an event on its own, at a chosen moment, with no click from the visitor.
- Making an "Au clic" event appear or disappear depending on where you are in the scene: a "Sortie" (exit) button has no business being there from the first second, you want it to turn up once the scene has been seen.
- Animating an event through time, which needs moments at which to place steps, as explained in The "Animation" tab.
In all three cases it is the position on the timeline that decides. Without a duration that timeline does not exist: nothing can be placed on it.
You do not have to guess: when the duration is zero, the platform says so across the timeline. Your event tracks are there, but empty, and both counters stay frozen at 00:00,0.

Setting the duration
Open "Options de la scène", "Général" tab, "Temps et durée" block. Three settings live there:
- "Temps sur la scène (mm:ss)" (time on the scene): two fields, minutes and seconds. This is the setting that unlocks everything else.
- "Jouer la scène en boucle" (loop the scene): once the duration is over, the scene starts again instead of stopping.
- "Afficher time line" (show timeline): shows the visitor a progress bar during the scene.
A 360 video scene arrives already set
Everything above concerns image backgrounds only. A scene built on a 360 video takes, by default, the duration of the video itself. Its timeline is usable straight away: you can stagger your automatic events from the moment the scene is created.
26The four activation modes
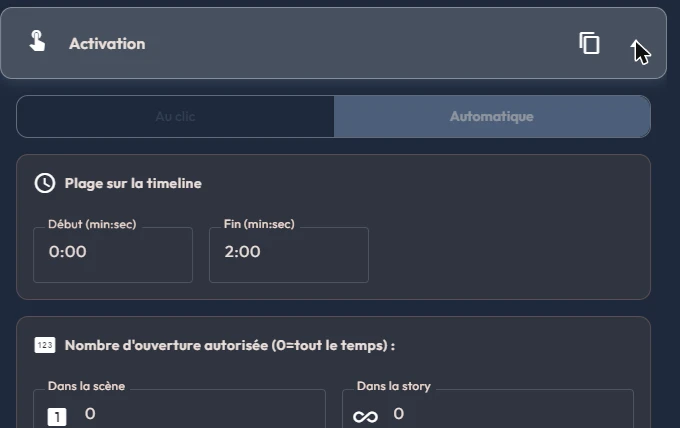
Every event fires according to an activation mode, chosen in the "Activation" block of its "Général" (General) tab. This choice decides who is in charge: the visitor or you. A 360 story offers two modes; a "Réalité Mixte" (mixed reality) story offers four.
"Au clic" (on click): the visitor decides
The event is represented by a point of interest in the scene; nothing happens until the visitor clicks it. This is the free-exploration mode: the visitor looks around, spots the markers, picks their own order. Use it for anything optional or consultable on demand: an information sheet, an on-request sound, a navigation arrow. The visitor is active, they rummage, and they can skip what does not interest them.
"Automatique" (automatic): you decide
The event fires on its own, over its time range, with no action from the visitor. This is the guided-narration mode: an instruction shown on arrival in the scene, an audio commentary that starts, a question that pops up at the right moment. Use it for everything the visitor must see or hear without having to look for it.
The visitor watches the sequence you wrote, then takes back control. To stagger several automatic events in one scene, the scene must have a duration: see The prerequisite: give the scene some time.
"Zone": movement decides (mixed reality)
In "Réalité Mixte" (mixed reality) stories, the event can fire when the visitor enters or leaves a zone of the room. This is the mode for physical experiences: content that launches when someone approaches a real workstation. Three settings:
- The zone targeted, among those defined in the scene.
- The direction, "Entrée" (Entry) or "Sortie" (Exit); their tooltips read "À l'entrée dans la zone" (On entering the zone) and "À la sortie de la zone" (On leaving the zone).
- "Déclenché par" (Triggered by): "Tête" (Head), the headset's position (the default), "Main" (Hand), hand tracking, or "Les deux" (Both).
"Bulle / Porte": crossing a 360 video (mixed reality)
The fourth mode fires the event when the visitor's head enters a 360 video placed as a bubble or a gate in the scene, or leaves it. You pick the video in the "Vidéo 360 (bulle / porte)" list, then "Entrée" or "Sortie". If no eligible video exists in the scene, the screen says so and the list stays empty.
A note under the buttons warns that this is a headset-only trigger: the web preview has no immersion and will not play it. It also states that, with a delay, the event only runs if the visitor is still inside (or outside) when the delay expires.
Both spatial modes share one setting, "Délai avant exécution (s)" (delay before execution, in seconds), in half-second steps. Zero means immediate. Beyond that, the event waits for the delay, and the wait is cancelled if the opposite movement happens in the meantime: a visitor entering a zone then leaving it before the delay is up triggers nothing. That is what stops a mere walk past a zone from launching content.
Limiting repeats
Below the activation toggle, the "Nombre d'ouverture autorisée" (number of openings allowed) block carries two independent counters, "Dans la scène" (in the scene) and "Dans la story" (in the story). The label spells out the convention: zero means "always", not "never".
This is the setting for anything that must not repeat. A welcome message to be seen only once is set to 1 in the story. A comment that may replay on each visit to a scene, but only once per visit, is set to 1 in the scene and 0 in the story.
27Variables: the story's memory
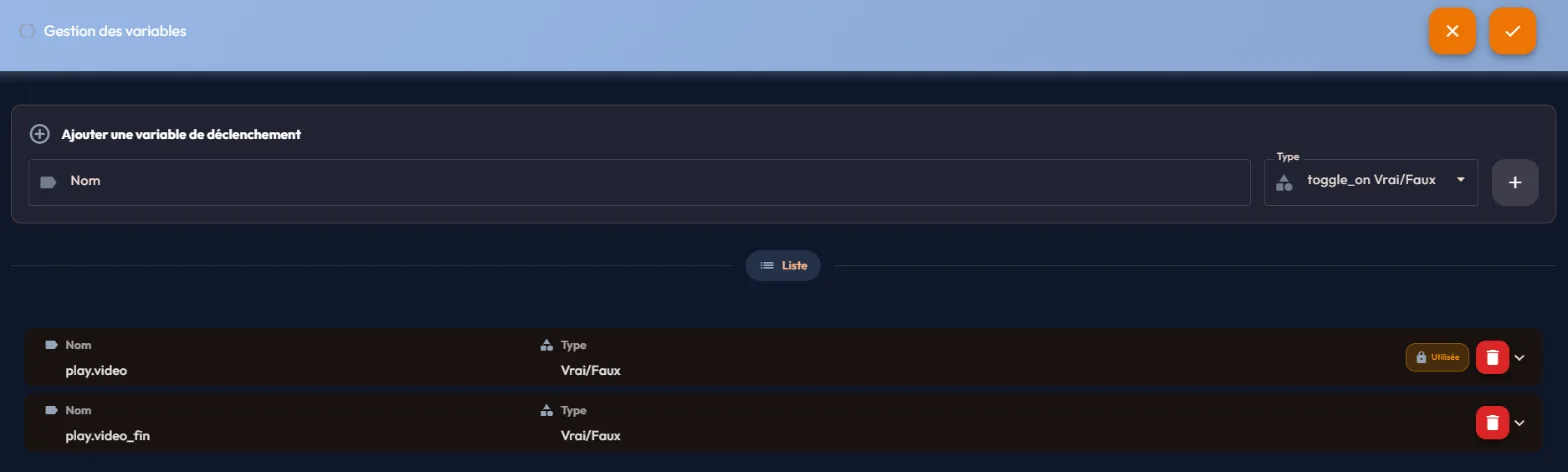
A variable is a value internal to the story that records what the visitor does: did they find the key, which answer did they pick, how long did they take. It belongs to the whole story: a value set in one scene can be read in every other. Variables are created in the "Gestion des variables" (Variable management) panel, opened by the "Variables" button on the editor's rail.
Creating a variable
At the top of the panel, the "Ajouter une variable de déclenchement" (Add trigger variable) card asks for a "Nom" (Name) and a "Type", then a click on the "+" button or the Enter key. The button stays inactive while the name is empty, and a name already taken is ignored without any message. Nothing is saved until you click "Enregistrer" (Save) at the bottom of the panel: the cross in the header cancels.
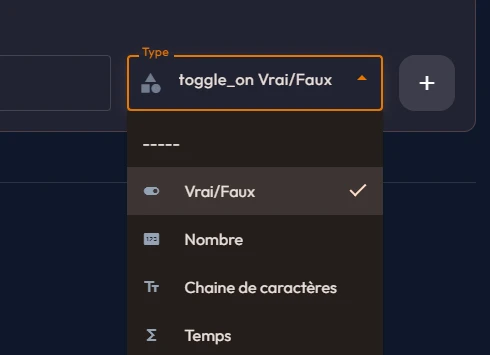
| Type | What it records | Typical use |
|---|---|---|
| Vrai/Faux (true/false) | A switch: the thing is done or it is not. Initial value of your choice: FAUX or VRAI. | "The key has been found", "the safety instructions have been read". |
| Nombre (number) | A numeric value, comparable with =, > and < in conditions. | A level reached, a numeric choice made by the visitor. |
| Chaine de caractères (text) | A text, picked from a list of values you declare below the variable's row, in the "Valeurs de la variable" (Variable values) field. | A visitor profile: "beginner" or "expert", steering the rest of the journey. |
| Temps (time) | A stopwatch, driven by three actions: Start, Stop, Set (impose a value). | Timing an exercise across two scenes. |
The initial value
Below the add card, the "Liste" (List) table shows your variables in three columns: "Nom", "Type" and "Valeur initiale" (Initial value). The initial value is the value the variable holds at the very start of the story, before anything has changed it.
It is set in place, in the list: FAUX or VRAI for a Vrai/Faux, a numeric field for a Nombre or a Temps, the list of declared values for a Chaine de caractères. While the list is empty, the panel shows "Aucune variable pour l'instant" (No variables yet).
For a Chaine de caractères, the values are typed below the variable's row, in "Valeurs de la variable": type the text, then Enter or a comma. Each value becomes a tag you can remove. Values are converted to lower case, and the first one typed becomes the initial value.
Changing a variable mid-story
Three places let you change a variable's value during the visit:
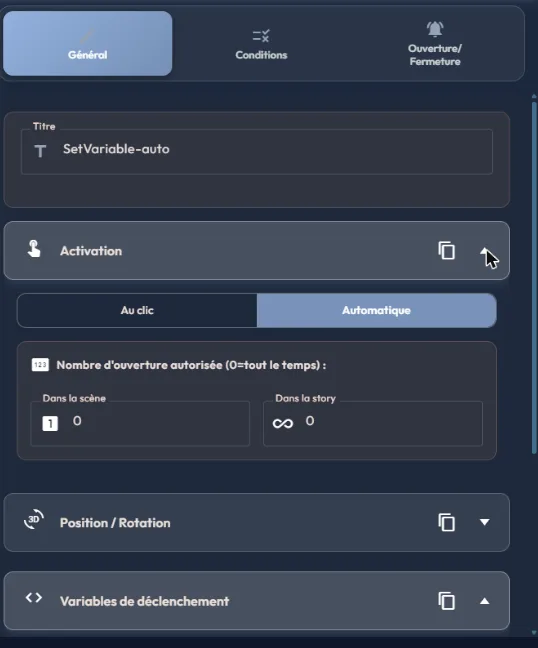
- The "Modifier une variable" event, in the "Avancé" (Advanced) category, placed in a scene like any other event. Its "Variables de déclenchement" (Trigger variables) block and its "Ajouter" (Add) button name the variable to change; for a Nombre, you can add, subtract or set a value, for instance plus one on every click.
- The "Ouverture / fermeture" (Opening / closing) tab of any event, which can change a variable as a side effect (see The "Ouverture / fermeture" tab).
- In choice questions, the variable assignment set directly on an answer.
The visitor sees nothing: the variable changes behind the scenes. To check your setup, the editor's preview shows the current value in its information panel. Reading a variable happens in the events' "Conditions" tab (see Conditions). Full examples follow in One real case, then four mechanics step by step.
Deleting a variable
28Dynamic tokens: showing a value that changes
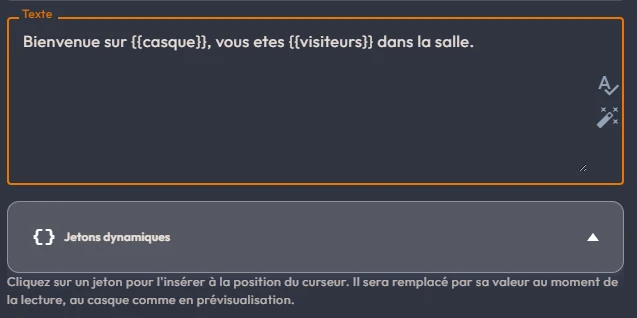
Fixed text always says the same thing. A token is a word between double braces, dropped into the "Texte" field of a Texte event, that is replaced at playback by a computed value: the headset battery level, the name given to the device, the number of visitors in the room, the time, the score obtained on a question set. The same text then reads differently for each visitor and at every moment.
Where to place them
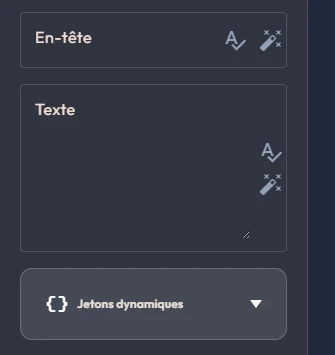
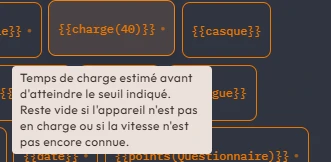
Open a Texte (text) event. Below the Texte field of its input screen, a collapsible "Jetons dynamiques" (dynamic tokens) block lines up every available token. Put the cursor where you want it in your text, then click the token: it is inserted at that exact position, and the cursor moves just after it. Hover a token before clicking: a tooltip tells you what it will show.
The live value dot
Some tokens carry a small dot. It marks a value that is refreshed while the panel stays on screen: the battery going down, the scene stopwatch running, the time changing. The other tokens are set when the panel opens and no longer move while it stays open.
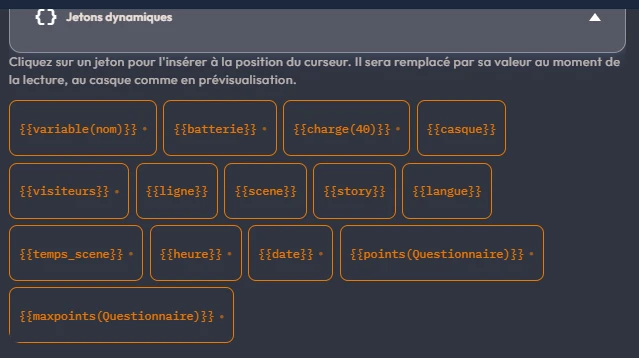
The fourteen tokens
| Token | What it shows | Live value |
|---|---|---|
{{variable(nom)}} | The value of a story variable, among those you defined. | yes |
{{batterie}} | The device battery level, as a percentage. | yes |
{{charge(40)}} | The estimated charging time before reaching the threshold in brackets. Stays empty if the device is not charging, or while the charging rate is not known. | yes |
{{casque}} | The name given to the headset when it was paired. | no |
{{visiteurs}} | The number of headsets in the room, this one included. | yes |
{{ligne}} | The route line assigned to this headset. | no |
{{scene}} | The title of the current scene. | no |
{{story}} | The title of the current story. | no |
{{langue}} | The active language. | no |
{{temps_scene}} | Time elapsed since the scene started, in minutes and seconds. | yes |
{{heure}} | The current time, in hours and minutes. | yes |
{{date}} | Today's date. | yes |
{{points(Questionnaire)}} | Points scored on the question set named in brackets. | yes |
{{maxpoints(Questionnaire)}} | The maximum score of that question set. | yes |
Tokens that expect a word in brackets
{{variable(nom)}} expects a variable name, exactly as you wrote it in the "Gestion des variables" (Variable management) panel. It is the bridge between the two notions: the variable remembers, the token displays. A variable counting the clues found shows nowhere until you display it; put {{variable(indices)}} in a text and the visitor reads their own counter.
{{points(...)}} and {{maxpoints(...)}} expect the name of a question set in the story. Together they write a full score: "Vous avez obtenu {{points(Securite)}} points sur {{maxpoints(Securite)}}." Finally, {{charge(40)}} expects a threshold as a percentage: the token then announces the time left before the battery reaches that level.
Three example uses
- A personalised welcome panel: "Bienvenue sur {{casque}}, vous êtes {{visiteurs}} dans la salle."
- A duration reminder on a guided tour: "Il vous reste {{temps_scene}} sur cette étape."
- A battery warning, combined with the "Niveau de batterie" (battery level) condition described in Conditions: a panel that only appears below the threshold and reads "Batterie à {{batterie}} pour cent, pensez à rebrancher le casque."
29Conditions: reserving an event for a situation
An event's "Conditions" tab, the second in its settings panel, restricts its execution to cases where one or more conditions are met. Example: a navigation arrow that only leads upstairs once the key has been found. As long as its conditions are not met, the event does not execute: a click on its point of interest goes nowhere, an automatic trigger is ignored. As soon as they are, it behaves like any other event.
Conditions combine with AND/OR. The "Sous condition" (sub-condition) type assembles exactly two conditions with their own AND/OR: "(A and B) or C". Eleven types are offered in a 360 story; two more, "Trigger" and "Ligne disponible", only appear in "Réalité Mixte" (mixed reality), thirteen in all. The table is the reference; conditions in situation are shown in One real case, then four mechanics step by step.
| Condition type | The event only executes if... |
|---|---|
| Ouverture d'un évènement (an event was opened) | another event has been opened a certain number of times. You designate a scene, one of its events, a comparator (=, > or <) and a number: "> 0" reads as "has been opened at least once". |
| Fermeture d'un évènement (an event was closed) | the same count, on an event being closed. |
| Réponse à une question (answer to a question) | the visitor picked a specific answer to a question. |
| Valider une question (validate a question) | a question was validated with a "Correcte" (right) or "Erronée" (wrong) answer, your choice. |
| Réponse à un Questionnaire (answer to a question set) | a question set's score sits between a "Pourcentage Min" and a "Pourcentage Max". |
| Seulement sur tablette de contrôle (control tablet only) | the story is played on a trainer's control tablet (with a "Forcer l'affichage sur le web" option to force web display). |
| Jouer sur (played on) | the story is played on the given support: "Web" or "Casque" (Headset). |
| Variables | a story variable has the expected value (equality for true/false and text; =, > or < for numbers and stopwatches). |
| Ouverture d'une scène (a scene was opened) | a scene has been opened a certain number of times (comparator =, > or < and number of visits). |
| Trigger | a 3D object marked as a trigger has been activated. You designate a scene, then one of its triggers. Only Objet 3D events with both the "Mixed Reality object" and "Trigger" switches turned on appear in that list. "Réalité Mixte" only. |
| Ligne disponible (route line available) | the route line you designate has not yet been claimed by any headset. "Réalité Mixte" only, and the type only appears if route lines have been defined. See Several visitors in the same room. |
| Niveau de batterie (battery level) | the device battery is below, above or equal to the "Seuil (%)" (threshold) you set, according to the chosen comparator. Available in every story. |
| Sous condition (sub-condition) | a group of two conditions, with their own AND/OR, is met. There is no further level. |
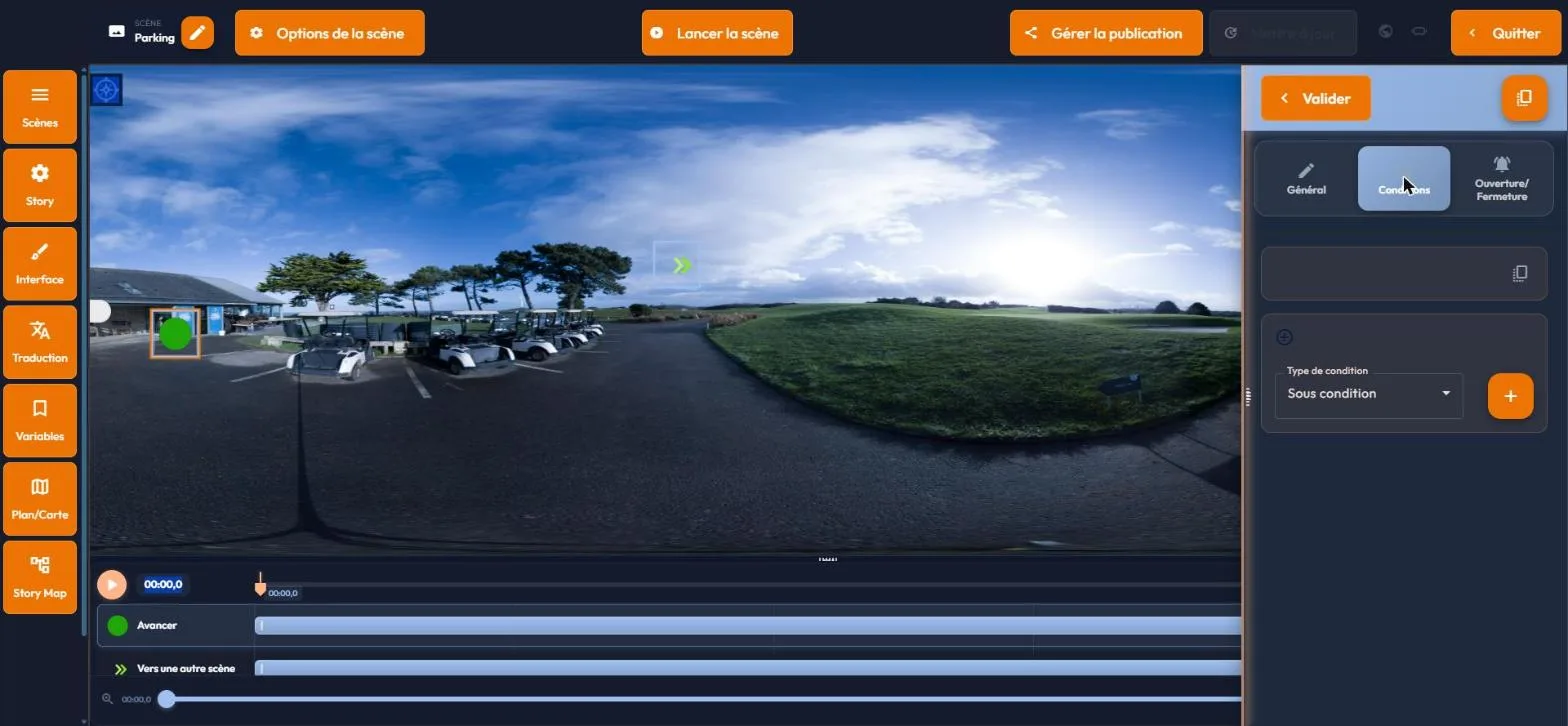
On the story map, navigation links under condition are marked with the "Conditionné" (conditional) type in the legend.
Battery level: a condition re-evaluated continuously
The "Niveau de batterie" condition does not behave like the others. Every other condition records an established fact: an answer given, a scene opened, a variable set. This one is re-evaluated continuously during playback: the event appears as soon as the comparison becomes true and disappears as soon as it is false again, for instance when the headset is plugged back in and its battery climbs back above the threshold.
That is what makes it useful for a warning aimed at whoever is running the room: the panel shows itself and clears itself. It is available in every story, mixed reality or not. Its form asks for a comparator (lower than, greater than or equal to) and a threshold as a percentage between 0 and 100; the add button stays inactive while either is missing.
30One real case, then four mechanics step by step
This section shows variables and conditions in situation. The first example is taken as-is from a welcome scene built by a practitioner; the four mechanics that follow are variations on the same principle.
The real case: the avatar who speaks when asked to
What we want: on arrival in the scene, a filmed guide is already standing in the setting, at scale, motionless. A picto sits at their feet. The visitor clicks, the guide comes to life and delivers the welcome. Nothing starts on its own, but everything is already in place.
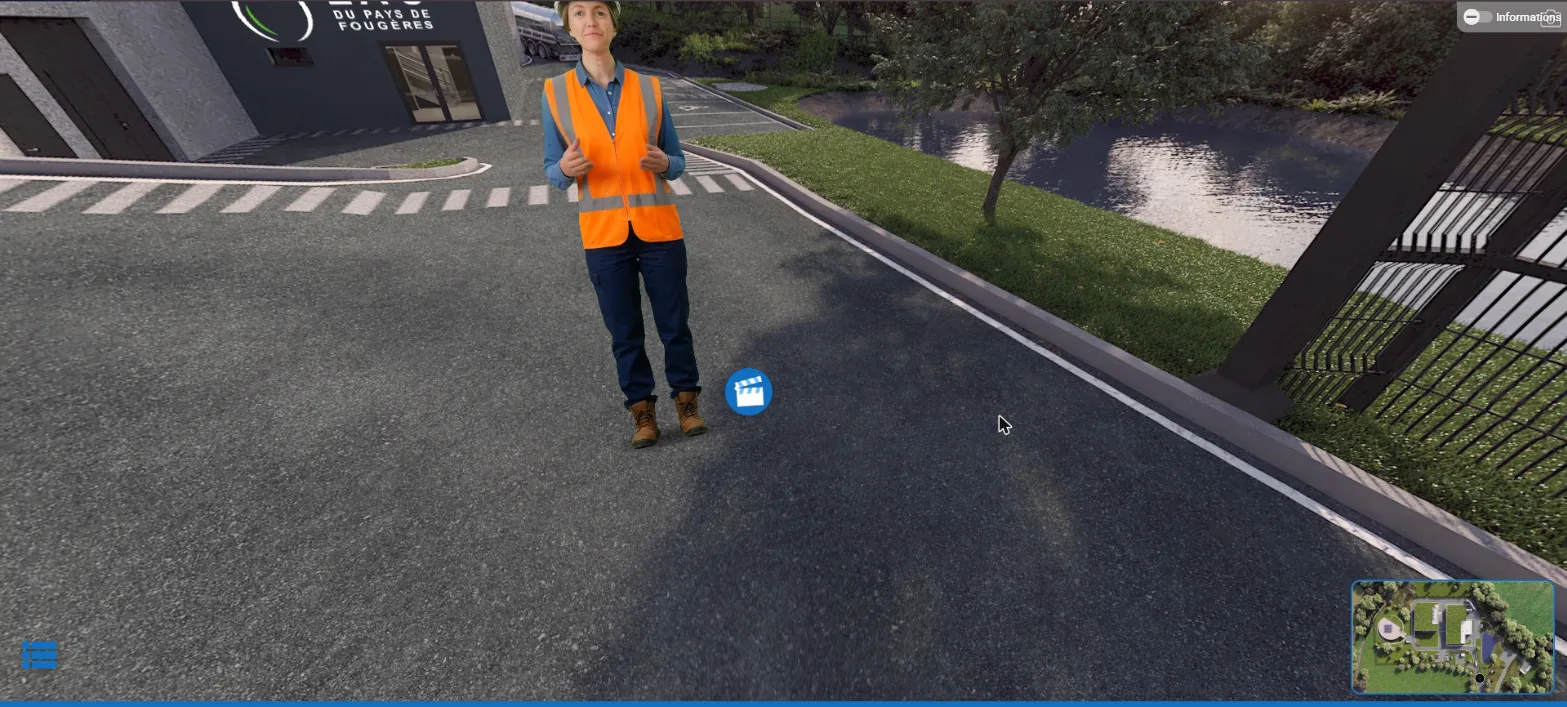
The variable: just one, of type Vrai/Faux (true/false), with an initial value of FAUX (false). It says one thing only: should the video be running, yes or no.
Three events, three roles:
| Event | Activation | What it does |
|---|---|---|
| A "Modifier une variable" (Set a variable) event that resets | Automatique (automatic) | On every entry into the scene it puts the variable back to FAUX. With no condition at all: it always fires. |
| The start picto | Au clic (on click) | The object placed at the guide's feet. On click, it sets the variable to VRAI (true). |
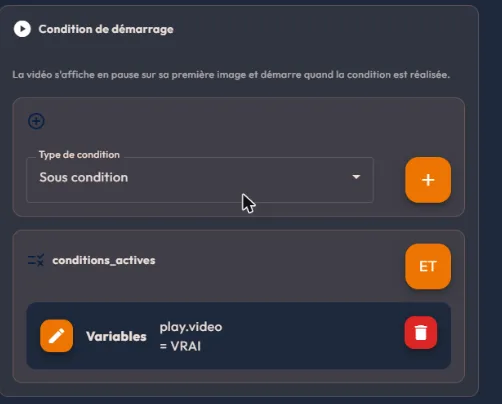
| The guide's video | Automatique (automatic) | It appears on arrival but stays frozen: its "Condition de démarrage" (start condition) waits for the variable to be VRAI. |
Where the trigger sits: on the first two events, "Général" tab, "Variables de déclenchement" (trigger variables) block. Two dropdowns, the variable and the value. That is all.
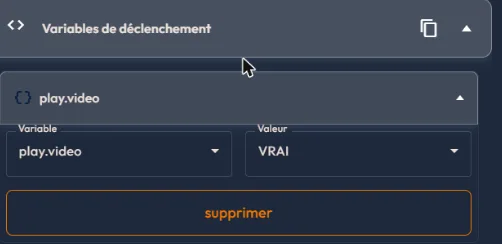
Where the condition sits: this is where the build gets subtle. It is not in the "Conditions" tab. It is in the video's "Média" block, below the transparency mask, in the "Condition de démarrage" (start condition) sub-block, which the platform defines itself: "La vidéo s'affiche en pause sur sa première image et démarre quand la condition est réalisée" (the video shows paused on its first frame and starts when the condition is met).
That sub-block only appears when the video's display mode is "Localisé" (located), the mode a new video is born in. Switch it to "Premier plan" (foreground) and it disappears.
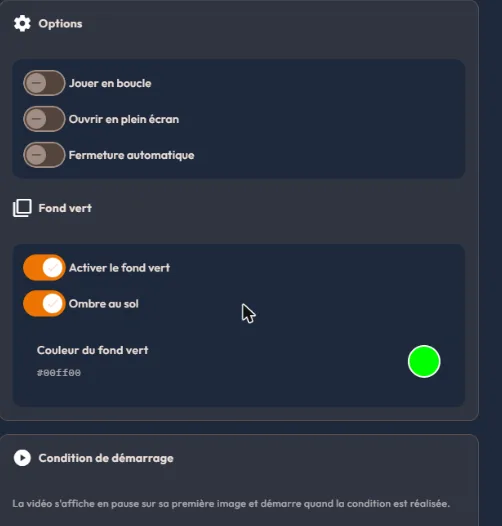
The green screen settings: the video was shot against a green screen, and the platform keys it out at playback. In the video event's "Média" block, the "Fond vert" (green screen) sub-block gathers six settings:
- "Activer le fond vert" (enable green screen).
- "Ombre au sol" (ground shadow): switch it on, otherwise the figure seems to float above the setting.
- The green screen colour, shown as a swatch.
- "Tolérance" (tolerance), set by eye: how far a colour close to the green still counts as background. Too high and it eats into the subject.
- "Douceur des bords" (edge softness): widens the transition between subject and void.
- "Anti-halo" (spill suppression): removes the green tint bleeding onto the outlines.
One last, decisive setting: in the "Mode d'affichage" (display mode) block, the video is set to "Localisé" (located) rather than "Premier plan" (foreground), at a reduced size. That is what places it at a precise spot in the setting, at human scale, instead of pinning it in front of the visitor's eyes.
1. The door that only opens once the key is found
Goal: in the Boutique (shop), the staircase is only reachable once the key on the counter has been spotted. The right tool: a Vrai/Faux (true/false) variable.
- Open the "Gestion des variables" (Variable management) panel with the "Variables" button on the rail, and create the variable CleTrouvee, type Vrai/Faux, initial value FAUX.
- In the Boutique scene, place an Image event "The club key", activation "Au clic" (on click), on the counter.
- On that event, "Ouverture / fermeture" (Opening / closing) tab, "Ouverture" section: in "Gestion des variables", set CleTrouvee to VRAI.
- Still in the Boutique, place the Vers une autre scène (to another scene) event leading to the Escalier (staircase).
- On that arrow, "Conditions" tab: add a condition of type Variables, with CleTrouvee = VRAI.
What the visitor experiences: until they click the key, the arrow to the staircase does not execute, the way is shut. As soon as they open the key image, the variable flips, and the same click on the arrow takes them upstairs. No error message is shown by default: to explain the block, add a Texte event "Find the key first", conditioned the other way round (CleTrouvee = FAUX).
2. The journey that forks on an answer
Goal: in the Hall, one question steers the visitor towards a beginner or expert route. The twist: here again, no variable is needed. The "Réponse à une question" (answer to a question) condition reads the chosen answer directly, and in any case a variable assignment placed on an answer could not receive a text value.
- In the Hall, place a Question à choix (choice question) "Have you played golf before?", activation "Automatique" on arrival in the scene.
- Give it two answers: "It is my first time" and "I play regularly". Neither is ticked as the right answer: there is no score here, only routing.
- Place two Vers une autre scène events: one towards the Préau (discovery route), the other towards the Vue drone (expert route).
- On the first arrow, "Conditions" tab: type Réponse à une question (answer to a question), the Hall question, answer "It is my first time".
- On the second arrow, the same condition, with the answer "I play regularly".
What the visitor experiences: they answer a harmless question, and only the arrow matching their answer works. It feels like a tailor-made journey; you only placed one question and two conditions, without a single variable.
3. The element that only appears on the second visit
Goal: when the visitor comes back to the Hall, a bonus content awaits them, absent on the first visit. The twist: here, no variable is needed, the "Ouverture d'une scène" (a scene was opened) condition counts the visits on its own.
- In the Hall, place the event to reserve for the second visit, for instance a Texte "Welcome back!", activation "Automatique".
- On that event, "Conditions" tab: add a condition of type Ouverture d'une scène, target the Hall scene, comparator >, number 1.
What the visitor experiences: on the first visit, nothing; the scene has only been opened once, the condition is not met. When they return to the Hall after a detour through the Boutique, the visit counter exceeds 1 and the personalised welcome shows up. The same recipe grants a reward to the persistent visitor, or avoids replaying an instruction already seen (reverse condition: comparator =, number 1).
4. The exit that requires the full tour
Goal: the end of the experience is only reachable after consulting three key contents, in any order. The right tool: three Vrai/Faux variables combined with AND.
- Create three Vrai/Faux variables, initialised to FAUX: ParvisVu, PreauVu, BoutiqueVue.
- In each of the three scenes, on the main content event (an instruction, a video...), "Ouverture / fermeture" tab, "Ouverture" section: set the matching variable to VRAI.
- In the final scene, place the Fin de story (end of story) event (or a Debriefing set to "Au clic" with the "Fin de la Story" option: in "Automatique" that box is greyed out).
- On that event, "Conditions" tab: three conditions of type Variables (ParvisVu = VRAI, PreauVu = VRAI, BoutiqueVue = VRAI), combined with AND.
What the visitor experiences: they explore in whatever order they like; the exit only unlocks once the three contents have been seen. This is the mechanic of training journeys where nothing may be skipped, without imposing a visiting order.
31The "Ouverture / fermeture" tab: chaining actions
The "Ouverture / fermeture" (Opening / closing) tab, third tab of an event's panel, describes what happens when the event opens and when it closes: play a sound, change a variable, launch other events. Example: an instruction which, once closed, launches an audio commentary and unlocks the rest of the tour. This tab is what turns isolated events into a script.
- On Ouverture (opening): a dedicated sound ("Audio joué au déclenchement de votre évènement", audio played when your event triggers, with its volume, overriding the global event sound), one variable to change ("Gestion des variables", variable management) and events to launch ("Évènements déclenchés", triggered events).
- On Fermeture (closing): one variable to change and events to launch (the "Évènements exécutés" (executed events) block, whose selection field is also labelled "Évènements déclenchés"). No audio block: there is no closing sound.
Each block acts on a single variable; to change several at once, chain a "Modifier une variable" (Set a variable) event. The events offered are those of the current scene. It is also here, together with the event's time range, that the moment the event appears is decided: the starting point of any animation built in the "Animation" tab.
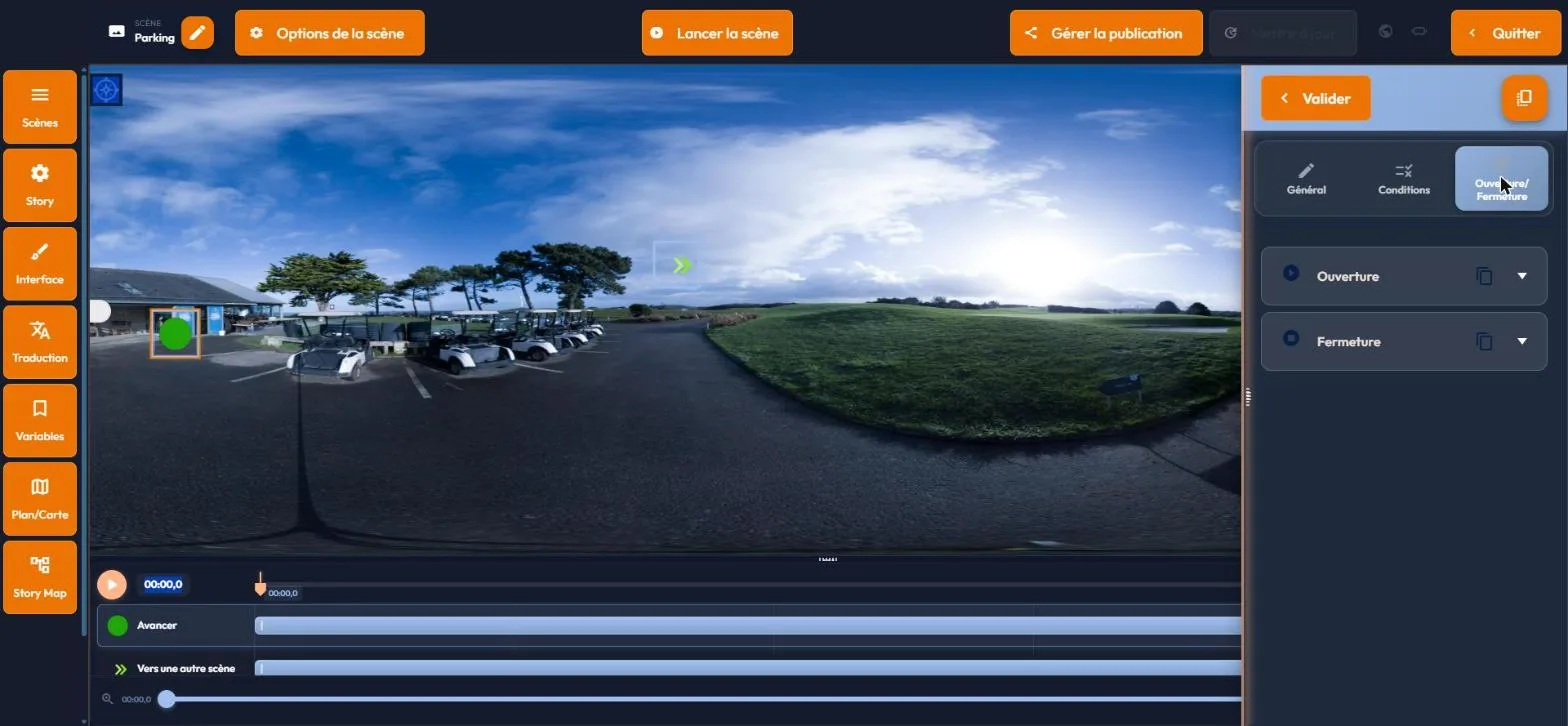
A real sequence: the Hall welcome
Closing an instruction launches the audio commentary and unlocks the rest of the tour.
- Create the variable AccueilVu, type Vrai/Faux, initial value FAUX.
- In the Hall scene, place a Consigne (instructions) "Welcome to the club", activation "Automatique", at the start of the scene.
- On the Consigne, "Ouverture / fermeture" tab, Ouverture section: pick a discreet chime in "Audio joué au déclenchement de votre évènement".
- Fermeture section: in "Évènements déclenchés", select the Audio event "Hall commentary" (placed in the scene, with neither "Au clic" nor "Automatique" activation: it waits to be triggered); in "Gestion des variables", set AccueilVu to VRAI.
- On the Vers une autre scène (to another scene) arrow leading to the Boutique, "Conditions" tab: type Variables, AccueilVu = VRAI.
What the visitor experiences: they arrive in the Hall, a chime accompanies the welcome message. They close it: the audio commentary starts at once, and the arrow to the Boutique becomes operational. Three actions chained on a single gesture, closing the message. The same logic extends at will: a triggered event can in turn, on its own closing, trigger others.
32The "Animation" tab: moving an event through time
The "Animation" tab, fourth tab of an event's panel, gives it movement by placing étapes (steps). A text sliding to the right as it fades, a 3D object growing as you approach, an avatar crossing the room, an image turning red at the critical moment: all of it is set here.
It is also what lets you follow a moving subject in the scene: a label, an arrow or a halo placed on someone walking or on a machine at work stays attached to it throughout the shot.
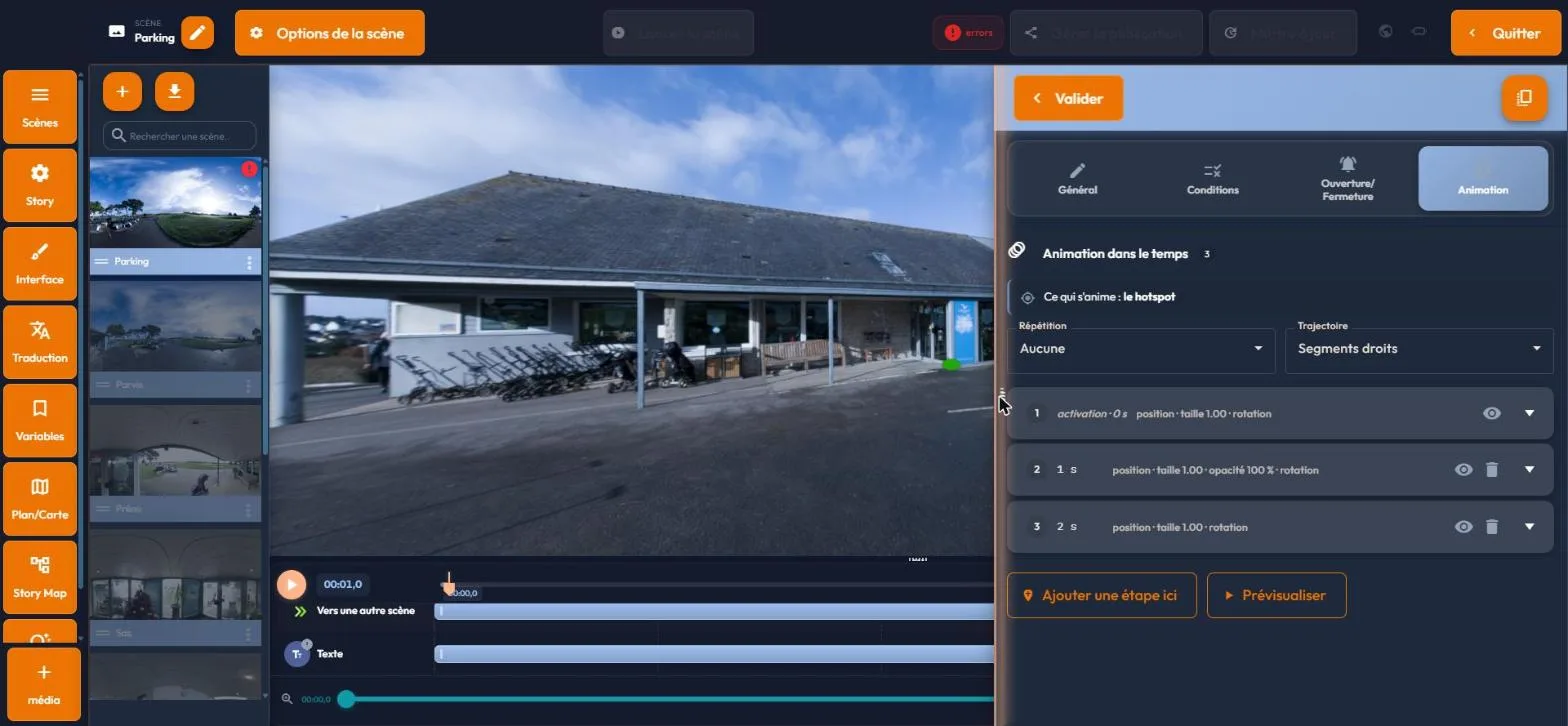
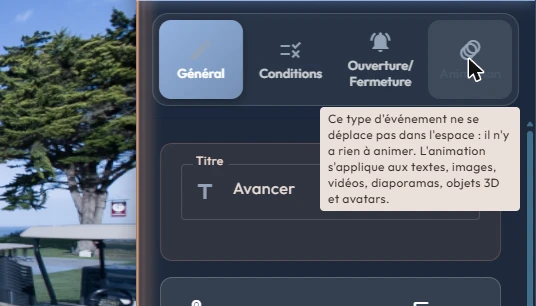
The tab is always visible, but it only becomes active for seven event types. Six occupy a place in space: Texte (Text), Image, Vidéo (Video), Diaporama (Slideshow), Objet 3D (3D object) and Avatar. The seventh, the Effet visuel (Visual effect), has no placement: there the tab only animates one of its settings, as explained further down.
On the others, a sound, a navigation arrow, a headset setting, there is nothing to animate: the tab stays greyed out and gives the reason. Its tooltip lists only the first six types.
The principle: steps, and what happens between them
A step describes a state at a precise moment: where the object is, how it is rotated, what size it is, what colour tints it, how opaque it is. You are not drawing a movement, you are placing markers, and the platform works out everything that happens between two markers. That calculation, interpolation, produces the animation.
Between two steps, each value moves from one to the other. If step 1 puts the panel on the left and step 2 puts it on the right four seconds later, at the two-second mark it is in the middle, without you writing anything.
Each step's "Transition de l'étape" (Step transition) list sets the pace of that progression: "Vitesse constante" (Constant speed), "Départ et arrivée en douceur" (Gentle start and end), "Accélère au départ" (Speeds up at the start), "Freine à l'arrivée" (Slows down at the end) or "Instantané (saut)" (Instant (jump)). After the last step, the object stays in the state it describes.
A step only states what it changes: any setting it does not mention keeps its current value. So you can write "it grows at six seconds" without re-entering its position. The list stays readable: each line announces in plain words what it changes, position, size, opacity, tint or image.
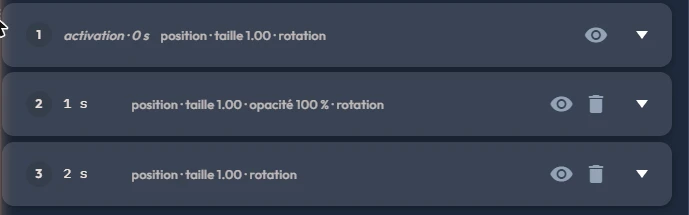
One exception, and only one: images do not blend. When a step names a new image, it does not dissolve into the previous one: it replaces it outright the moment the step is crossed. Everything else, position, rotation, size, tint and opacity, moves continuously.
Building an animation, gesture by gesture
- Place the event in the scene, at its starting position, in the "Général" tab.
- Open the "Animation" tab and click "Ajouter une étape ici" (add a step here). Two lines appear: the locked start, and an arrival one second later.
- Move the timeline cursor to the moment you want, move the object in the scene, then click "Ajouter une étape ici" again: the step takes the cursor's moment and the position you just gave it.
- Repeat as many times as you need markers. Three or four is almost always enough.
- Expand a step to correct a figure, or use "Reprendre la position actuelle" (use the current position) to give it the current placement without losing its moment.
- Check with "Voir cette étape" (show this step) on each line, then with "Prévisualiser" (preview) for the whole thing.
No coordinates to type: the whole gesture is moving the object in the scene. The platform reads its position, rotation and size at the moment you add the step. The numeric fields are there to correct, not to build.
The first step is not yours to set
When you place your first step, the platform creates two: the starting state and the arrival state. The first carries a padlock and the words "Départ : à l'activation de l'événement" (start: when the event is activated). It is not a setting: it mirrors the event as you placed it in the "Général" tab. Its moment cannot be edited either: it is the moment the event appears, set elsewhere, and the animation always starts from there.
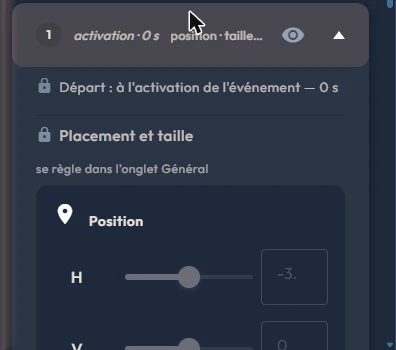
To change the starting state, change the event's position, rotation or size in the "Général" tab: the starting line follows. Every later step is yours to set freely, and to delete.
What moves: the point of interest, or the content
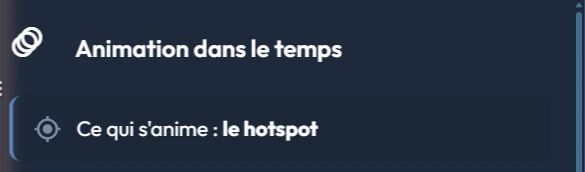
At the top of the panel, the "Ce qui s'anime :" (what moves:) line announces the animation's actual target. It changes with the event:
- An event that opens "Au clic" (on click) carries a point of interest, and that is what gets animated: the marker moves, grows and changes colour in the scene, before the visitor even opens it. The opened panel then follows it.
- An "Automatique" (automatic) event, which shows on its own, has no marker to move: the animation drives the content itself, the text panel, the image, the video or the slideshow.
- An Objet 3D or an Avatar is placed in the scene rather than pinned to a marker: the model itself moves, and the point of interest stays put.
The three setting groups of a step
Each step opens three groups of settings, each behind a switch. Not all of them are available everywhere: an unavailable group is struck through, and the reason is written right underneath. On an Effet visuel, the three groups are struck through and a fourth one replaces them, described right after.
| Group | What it sets | Available |
|---|---|---|
| "Placement et taille" (placement and size) | Position on three axes, rotation on three axes, and size. The sliders cover the same range as those in the "Général" tab. | On every step, except the first one, which is locked. |
| "Apparence" (appearance) | Colour and opacity, brought together in a single picker. | Everywhere, except on an Objet 3D and an Avatar, where it would have no effect. |
| "Contenu" (content) | The image shown from this step onwards. | Only on an "Automatique" Image event. On an "Au clic" event, the marker is animated, not the image. |
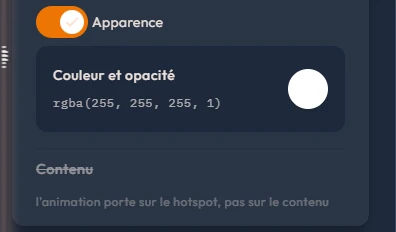
What does not animate: the text itself, sound, video playback, and the built-in appearance of 3D models. Animation moves, rotates, resizes, tints and varies opacity; it does not rewrite content. Special case: when the event's "Face à la caméra" (Face the camera) setting is on, that setting orients the content, and the animation no longer drives its rotation.
On an Effet visuel: animating a parameter
On an Effet visuel (Visual effect), the "Animation" tab varies a numeric setting over time: a water level that rises, a mist that thickens, a fire that dies down. At the top of the tab, the "Paramètre animé" (Animated parameter) list offers "Aucun" (None), then the animatable settings of the chosen effect.
Once the parameter is designated, each step offers a switch bearing its name and a slider, bounded as in the effect's panel; switching it on takes the setting's current value.
The three usual groups are struck through, with the reason: "Un effet visuel n'a pas de placement : seul son paramètre s'anime." (A visual effect has no placement: only its parameter animates.). As long as no parameter is chosen, the steps show: "Choisissez le paramètre à animer dans les réglages de la piste." (Choose the parameter to animate in the track settings.).
- What animates: only the slider settings (level, opacity, waves, intensity, range, flicker, density, height, width, drift, speed, wind, size, rise). Neither colours, nor switches, nor lists.
- One parameter per event. To animate two settings of the same effect, place two events.
- Changing the parameter erases the values already entered in the steps.
Colour and opacity, one single gesture
The "Apparence" group offers a single line, "Couleur et opacité" (colour and opacity), which opens a palette with a transparency slider. Both settings live together because they are chosen together: opaque white changes nothing, transparent white is a fade, a transparent colour does both.
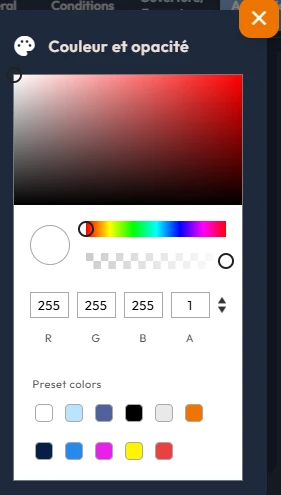
A tint multiplies, it does not replace: it combines with the event's original colours. A blue panel tinted red darkens without turning bright red, and the elements inside it stay distinct. White is the neutral value, the one that leaves the event untouched.
The start, and how it meets the timeline
An animation never starts at the beginning of the scene: it starts when the event appears. That moment is set elsewhere, on the scene's timeline and in the "Ouverture / fermeture" (Opening / closing) tab, and the "Animation" tab reminds you of it on its first line. Move the event along the timeline and its whole animation moves with it, with no step to adjust.
The moments typed on the steps read directly on the timeline: the "Instant sur la timeline (s)" (time on the timeline, in seconds) field shows scene time, the one under your cursor, not an internal count. There is no arithmetic to do. A step simply cannot come before the event appears.
Repeat and path
Two settings at the top of the panel apply to the whole animation.
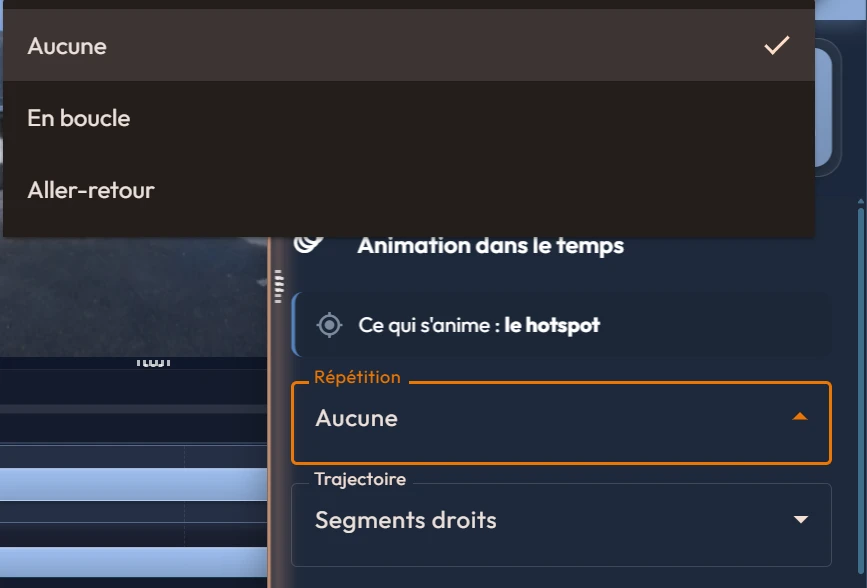
- "Répétition" (repeat): "Aucune" (none) plays the animation once and stops on the last step. "En boucle" (loop) starts again from the beginning; the return from the last step to the first is instant, so visible if the start and the end do not match. For a clean cycle, make the last step's state match the starting state, or choose "Aller-retour" (back and forth), which replays the animation in reverse and cannot produce that jump: it is the safe choice for continuous movement, a hovering object or a swing.
- "Trajectoire" (path): "Segments droits" (straight segments) joins the steps in straight lines, with a sharp angle at each one. "Courbe passant par les étapes" (curve through the steps) rounds the route while still passing exactly through every step. For organic movement, a bird, a character walking around an obstacle, choose the curve.
Checking your animation
- "Voir cette étape" (show this step), the eye icon on each line, shows one step's state.
- "Prévisualiser" (preview), at the bottom of the panel, plays the whole thing; the button appears as soon as there is more than one step.
- Touching a setting brings the timeline onto the step concerned: you always see what you are changing, never a neighbouring moment.
- The 2D view follows the animation: the event's marker is placed and sized according to the animation at the cursor's moment. Drag the timeline cursor and the marker travels its route, changing size as it comes closer or moves away. It is the fastest way to check a path without launching the test.
An animation travels with its event: duplicating the event, or copying it and pasting it into another scene, carries all its steps.
33Question sets: grouping, scoring, debriefing
A questionnaire (question set) is a group of questions by theme, with its scoring scale and its hints, which accumulates the points of every question attached to it, wherever they sit in the story. It is created in the "Story" panel, "Questionnaire" tab. Example: a safety course with three question sets, "EPI" (PPE), "Circulation" (traffic) and "Consignation" (lockout), hence three scores and three possible debriefings.
The whole thing takes four steps, in four different places:
- Create the question set in the "Story" panel.
- Attach the questions to it, one by one, from each question.
- Set the scoring, answer by answer.
- Place a Debriefing that reports on that specific question set.
Step 1: create the question set
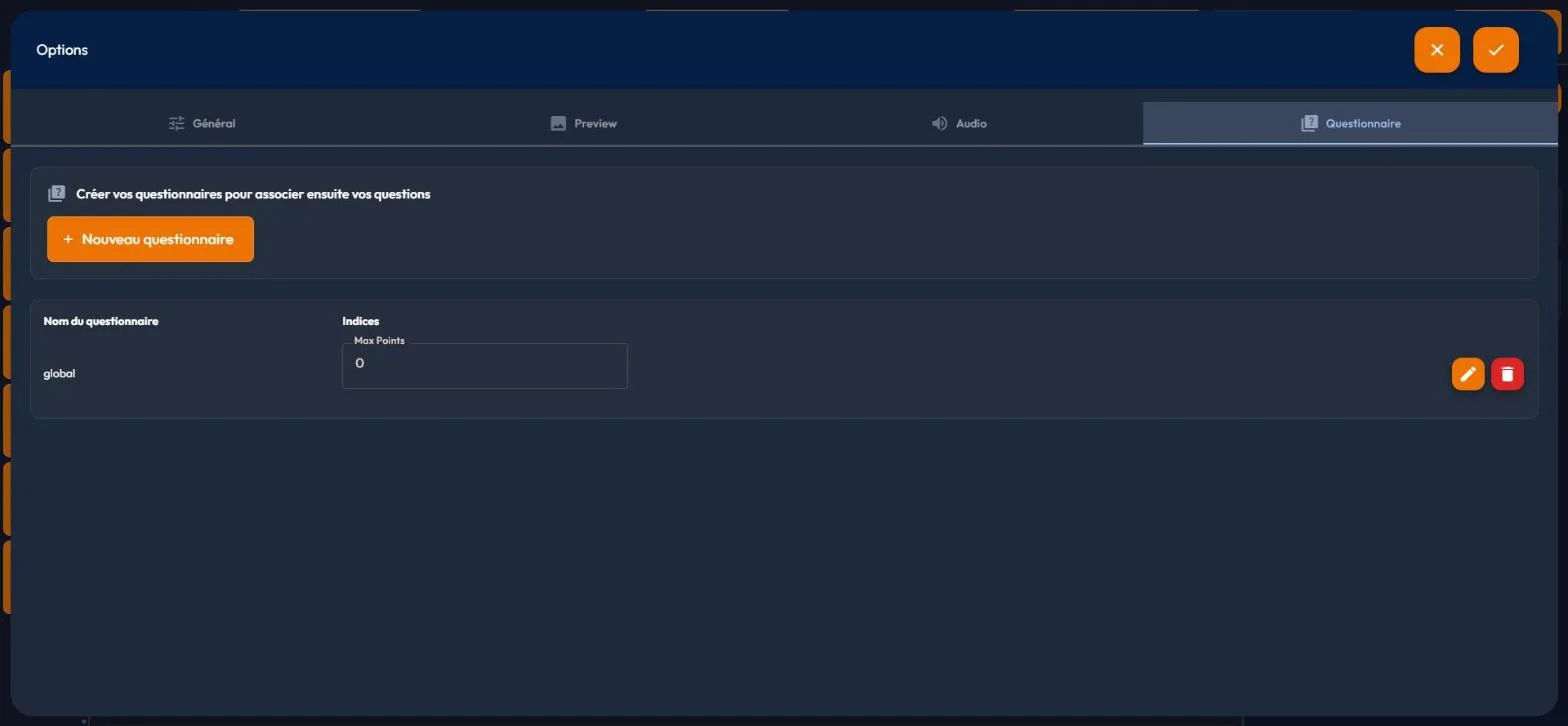
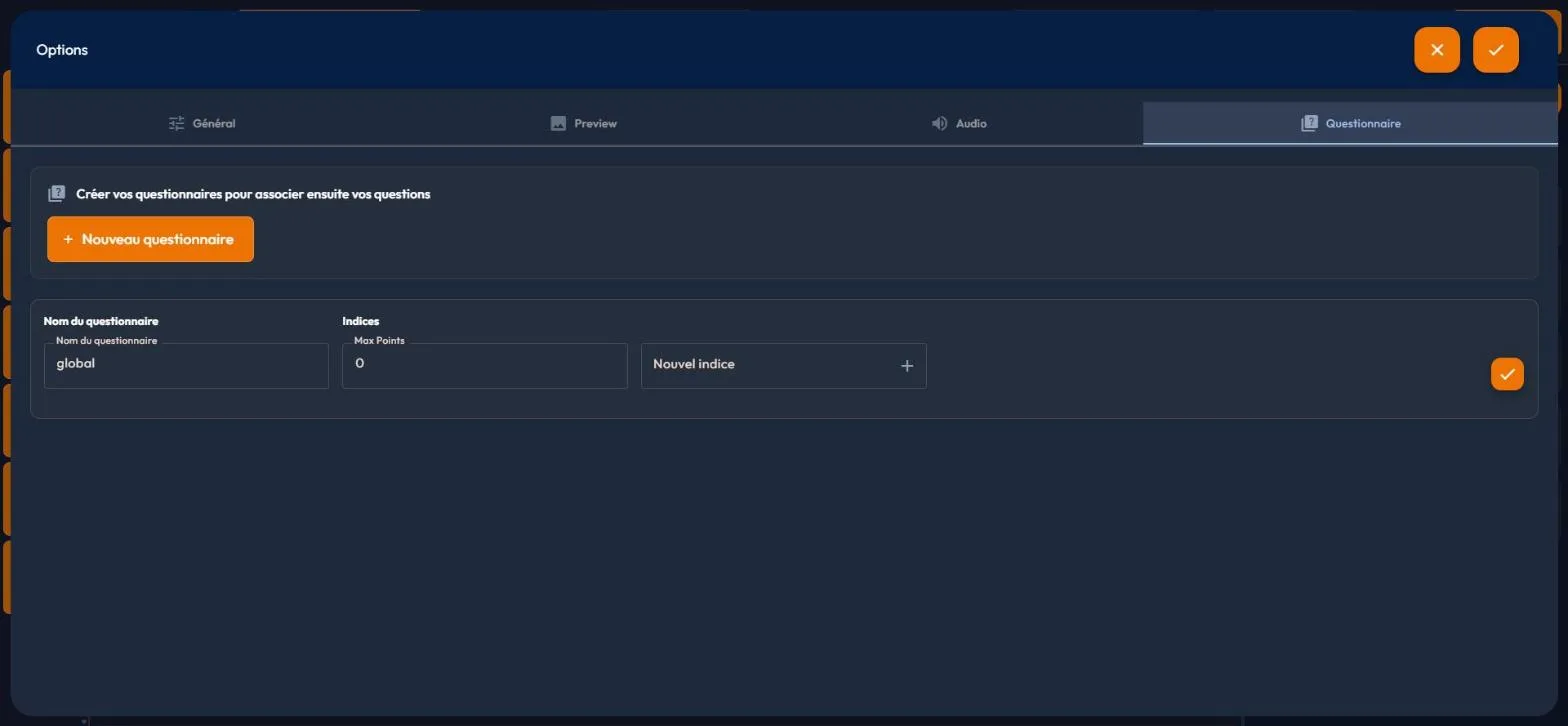
Open the "Story" panel with the "Story" button on the editor's rail, then its "Questionnaire" tab, subtitled "Créer vos questionnaires pour associer ensuite vos questions" (create your question sets, then attach your questions to them). The "Nouveau questionnaire" (new question set) button adds a row, and the pencil switches it to edit mode.
A question set carries three things: a "Nom du questionnaire" (name), a "Max Points", and a list of hints fed by the "Nouvel indice" (new hint) field and its + button.
The question set's name is its theme. Its "Max Points" sets the reference total from which the debriefing's percentages are computed.

Step 2: attach the questions and hand out the hints
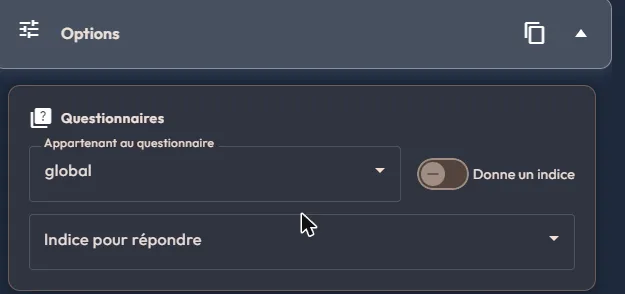
Attachment does not happen from the question set, but from each question. Open the question, "Options" block, "Questionnaires" sub-block. Three settings live there: the "Appartenant au questionnaire" (belongs to the question set) dropdown, the "Donne un indice" (gives a hint) switch, and the "Indice pour répondre" (hint to answer) dropdown.
Neither hint setting ever targets one specific hint: both designate a question set, and therefore its whole bank. You write the hints once, at question set level, and each question declares what it does with them. Two directions, not to be confused: a question can give a hint, another can lean on the hints to be solved. This is the treasure hunt mechanic.
| Setting | What it does |
|---|---|
| "Appartenant au questionnaire" | Attaches the question to a question set: that is where its points go, and that is the hint bank the two settings below target. A newly created question is attached to the "Global" question set by default. |
| "Donne un indice" | A switch: this question awards a hint from the targeted question set. It stays greyed out until a question set is chosen above, and it is off by default. |
| "Indice pour répondre" | Designates the question set whose hints act as help on this question. This is the opposite direction from the previous one: here the question leans on the help instead of producing it. |
These three settings only exist on questions: single choice, multiple choice, open answer and hidden objects. The other events tied to a question set, such as the Debriefing or Bonus/Malus, attach to it for the score alone and have no hint setting.
Do not confuse the question set with a quiz from the "Mes quiz" page. The question set belongs to a story: it groups questions already placed in scenes, and it carries their scoring. The quiz, described in "Mes quiz", is a store kept alongside your library: it scores nothing and belongs to no story.
The Bonus/Malus event also targets a "Questionnaire": it adds or removes points without asking a question, positive points for a bonus, negative ones for a penalty. Its "Affiche interface" (show UI) option shows the points to the visitor; without it, they are counted silently. Creating several question sets therefore means keeping several scores in parallel, each with its own summary.
Step 3: the scoring scale
Scoring is set as close to the answer as possible, and its shape changes with the question type. In a Question à choix (choice question), each answer has its own card, with a "Bonne réponse" (right answer) checkbox and a "Points" field.
In a Question à réponse libre (open question), the points are carried by the question, through two fields: "Points en cas de bonne réponse" (points for a right answer) and "Points en cas de mauvaise réponse" (points for a wrong answer), the latter letting you penalise mistakes. The open question is played in web publishing; headsets do not display it.
Step 4: the debriefing
The Debriefing event renders the result. In its "Options" block, the "Options du score" (score options) sub-block carries the two settings that matter: "Score relatif à" (score relative to), the dropdown where you name which question set is being debriefed, and "Mode d'affichage" (display mode), a toggle between "pourcentage" (percentage) and "Points".
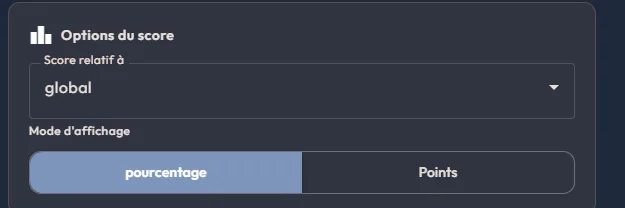
Nothing forces you to place just one debriefing. Each one reports on the question set it targets: you can put an "EPI" summary at the end of the safety module, a "Circulation" summary further on, and a "Global" summary at the very end of the story.
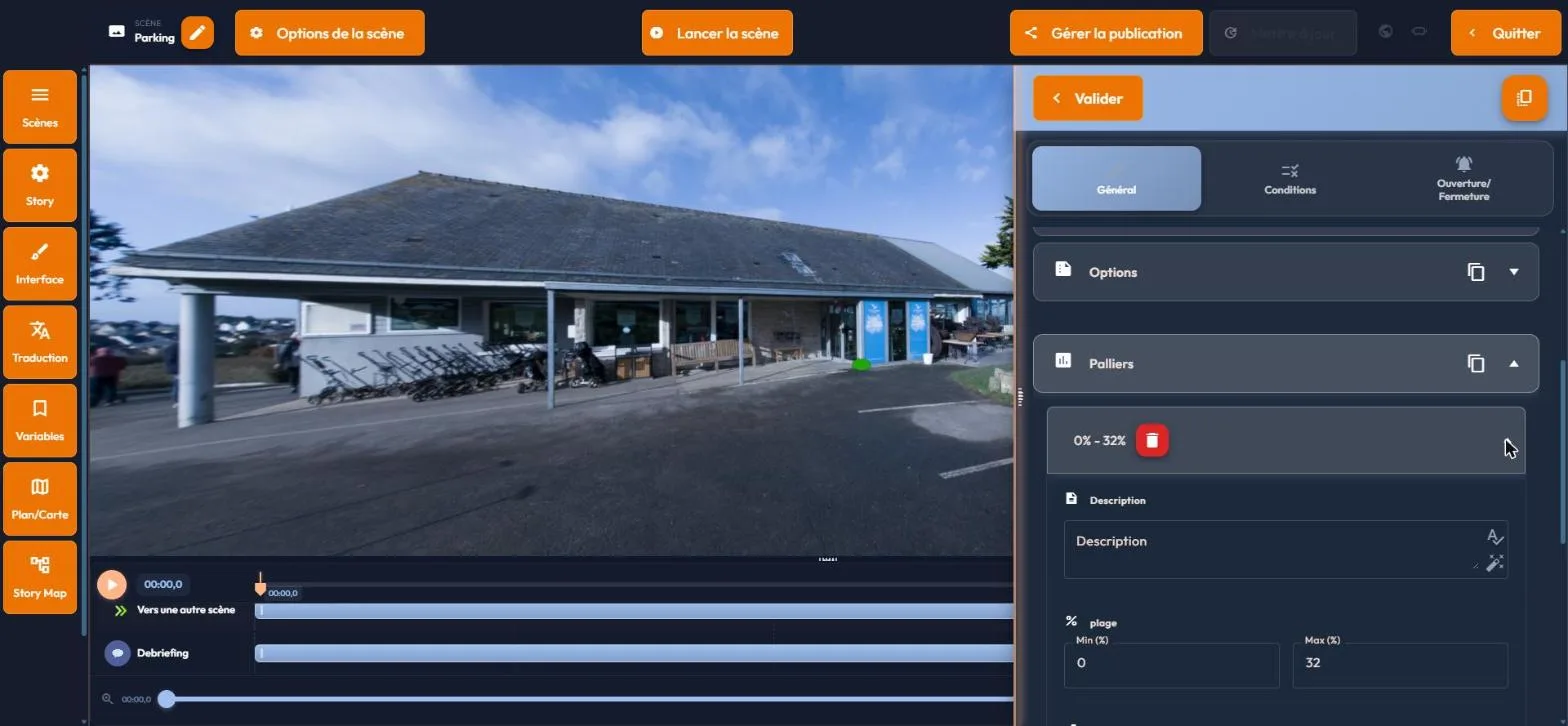
The "Paliers" (tiers) block carries the messages. A debriefing arrives with three tiers already created, 0 to 32%, 33 to 65% and 66 to 100%. Each unfolds into a "Description", the message the visitor will see, and a range defined by a "Min (%)" and a "Max (%)". The "Nouveau feedback" (new feedback) button adds more.
Reading out, numbering and shuffling the answers
A choice question, single or multiple, can be read aloud, answers included. Four settings work together: three in the question, one in the "Story" panel.
- The audio of each answer: every answer card has an "Audio" block. Pick a sound from the library, or click "Générer une voix" (generate a voice) to make it from the text (see Synthetic voices). On playback the question is read, then each answer that has an audio, in the displayed order.
- "Ordre des réponses aléatoire" (random answer order), in the "Type de réponse" (answer type) section: each participant sees the answers in a different order, drawn once per session. Only the kiosk keeps the order you typed. That typed order stays the reference for conditions and for reports.
- "Numérotation des réponses" (answer numbering), in the same place: "Aucune" (none), "1, 2, 3" or "A, B, C". The number follows the displayed order, even when shuffled: do not type it in the answer text. If some answers already start with a hand-typed number, the editor says so and offers "Retirer les numéros tapés" (remove typed numbers).
- "Annonces des réponses numérotées" (numbered answer announcements), in the "Story" panel, "Questionnaire" tab: two columns, "Numérotation en chiffres" (numbers) and "Numérotation en lettres" (letters). For each position you attach an audio with "Choisir dans la bibliothèque" (choose from the library) or "Générer une voix", then play or delete it. The announcement, for instance "Réponse A", is read just before the audio of the answer placed at that position.
A score across several scenes, step by step
Goal: assess the visitor throughout the club tour, and adapt the final message to their result. No variable to create: the question set accumulates on its own.
- In the "Story" panel, "Questionnaire" tab: create the "Découverte du club" question set and set its "Max Points".
- In the Hall, place a Question à choix about the club's history; "Appartenant au questionnaire" option: Découverte du club; put the points on the right answer.
- In the Boutique, place a game of Objets cachés (hidden objects: find three pieces of equipment), attached to the same question set.
- In the Escalier, place a Question à réponse libre, also attached, with its right- and wrong-answer points.
- In the final scene, place a Debriefing: "Score relatif à" Découverte du club, percentage display, and three tiers, for instance 0 to 32 ("Come back and see us..."), 33 to 65 ("Not bad!"), 66 to 100 ("A true club member!"), each with its text, audio and, if you wish, triggered events.
- Tick "Fin de la Story" (end of story) if this summary closes the experience. That box is only offered on a debriefing set to "Au clic" (on click): in "Automatique" it is greyed out under the message "Désactiver car l'ouverture est automatique" (disabled because opening is automatic). So set the debriefing to "Au clic", for instance triggered by the closing of the last question or by a "see my result" picto, and set its activation before having it triggered by another event: the choice then disappears.
What the visitor experiences: they answer along the tour, with no visible counter; at the end of the journey, the debriefing shows their score and the message of the tier they reached. Three scenes, three question types, one summary. On your side, each visitor's answers and scores are read in the "Résultats" (Results) tab of the reports.
34"Mes quiz": a reusable store of questions
The "Mes quiz" (my quizzes) page is a store of questions independent from stories: you write your questions ahead of time, keep them grouped in sets (a "quiz"), and you can pour in dozens of them at once from a spreadsheet. You reach it from the "Mes quiz" entry of the main menu, just below "Rapports" (Reports). Shared-library users do not see that entry.
Quizzes are stored alongside your media library, not inside a story: they are shared by all your stories, like your images and sounds. A question that calls for an image looks for it in that same library.
The page and its cards
The grid shows one card per quiz, preceded by the "Nouveau quiz" (new quiz) card. Below each card name: the number of questions, then the translation progress for each of your working languages. A red badge in the top right corner counts the questions that need fixing: the quiz stays usable, but those questions would not work as they are.
Three buttons at the bottom of a card: open the quiz, "Exporter (Excel)" (export to Excel) to download it as a spreadsheet, delete it. The search field filters on the name. As long as you have created no quiz, the page shows "Aucun quiz pour l'instant" (no quiz yet) and points you to "Nouveau quiz".
The four question types
| Type | What the participant does | What you fill in |
|---|---|---|
| "Choix unique" (single choice) | Ticks one proposal only. | The question text, the proposals, a single correct answer, the points. |
| "Choix multiple" (multiple choice) | Ticks several proposals. | The question text, the proposals, as many correct answers as needed, the points. |
| "Réponse libre" (free answer) | Types an answer on a keyboard. | The question text, the expected answer, the points for a correct and for a wrong answer. |
| "Objets cachés" (hidden objects) | Clicks objects in the scenery. | The question text, then the list of objects to find, with their image and their points. |
These are the same four questions as in a story, and the entry screen is the same: type and format, time to answer, sound, proposals, points, correct and wrong answer feedback. You find again the screen described in the input screens.
A choice question accepts proposals as images rather than text, four at most: that is the number of slots the headsets and the tablet can display. Beyond that, the extra proposals would stay invisible while their points still counted towards the score, making the maximum unreachable: the platform rejects the question rather than truncating it silently.
For hidden objects, you describe here the objects to find, their image and their points. Their position in the 360 degree scenery is set in the scene that hosts them. As long as no object is described, the question is flagged as needing completion.
The quiz editor
Opening a card, or creating a quiz, opens the editor as a full page, under the title "Nouveau quiz" or "Modifier le quiz" (edit quiz). In the left column: the "Nom du quiz" (quiz name), which is required, an optional description and the numbered list of questions. The + button adds a question and asks for its type, the two arrows move the question within the list, the bin deletes it. The selected question is shown on the right.
An incomplete question is flagged live: an orange badge for something to complete, a red badge for an error that would stop it working, and a "Points à corriger" (things to fix) box lists every issue below the question title. Empty question text, fewer than two proposals, no correct answer, several correct answers on a single choice question, an image missing from the library, a missing expected answer: the list is explicit.
What the store keeps, and what it leaves to the story
A stored question keeps everything that defines it on its own: the question text and its image, the type and the format, the proposals, the correct answers, the points, the correct and wrong answer feedback, the sound, the time to answer, the random answer order, their numbering ("Aucune", "1, 2, 3" or "A, B, C"), showing the correction, the automatic exit and the zoom permission.
It keeps nothing that depends on a story: the link to a question set, the hints, the events triggered by a feedback, the tracking identifier used by the export to your training platform, and the position of hidden objects in the scenery. Those are set when the question enters a scene.
Translating the questions
Above the question sits a row of tabs: "Contenu" (content) for the writing language, then one tab per additional language declared on your account. With no other language declared, the row has only the first tab and a message says so: "Aucune langue de traduction : ajoutez des langues dans « Mon compte », section « Préférences »." (No translation language: add languages in "My account", "Preferences" section.)
A language tab shows two columns: "Texte d'origine" (source text) on the left, field by field; "Traduction" (translation) on the right, with the matching box. Each box has an assisted translation button, "Traduire ce champ" (translate this field).
Two buttons act more widely, "Traduire la question" (translate the question) on the current question and "Traduire tout le quiz" (translate the whole quiz) on the whole quiz: they only fill boxes that are still empty, so your own rereading is never overwritten. An "n / N traduits" (translated) counter shows progress question by question, a second one for the whole quiz, repeated below the card.
A question whose proposals are images has no answer text to translate: the media itself carries its language variants, in the library.
Importing questions from a spreadsheet
Three buttons sit at the top of the page: "Télécharger la trame" (download template), "Importer (Excel)" (import from Excel) and "Nouveau quiz". Start with "Télécharger la trame": you get a workbook with two sheets, "Questions" where you fill in, and "Guide" which recalls the rule for each column. One row of the table equals one question. The "Importer (Excel)" button then takes the filled file back.
| Column | What it holds | Rule |
|---|---|---|
| Quiz | The name of the quiz the question goes into. | Required. Rows sharing a name form one quiz. |
| Type | The question type. | Required. Six accepted values, see below. |
| Question | The text shown to the participant. | Required. |
| "Réponse 1" to "Réponse 6" (answer 1 to 6) | The proposals. | For a single or multiple choice, text, at least two. For image proposals, the exact title of an image in your library. Not used for a free answer or for hidden objects. |
| "Bonnes réponses" (correct answers) | The number or numbers of the correct proposals. | A single number for a single choice, several separated by a semicolon for a multiple choice. |
| "Réponse attendue" (expected answer) | The expected text. | Free answer only, and required in that case. |
| Points | The points for a correct answer. | Optional, one point by default. |
| "Points mauvaise" (wrong answer points) | The points taken off for a wrong answer. | Free answer only, optional, zero by default. |
| "Feedback bonne réponse" (correct answer feedback) | The message shown when the answer is correct. | Optional. |
| "Feedback mauvaise réponse" (wrong answer feedback) | The message shown when the answer is wrong. | Optional. |
| "Image question" (question image) | The exact title of an image illustrating the question. | Optional. An image that cannot be found gives a warning, not an error. |
| "Temps (s)" (time in seconds) | The time limit, in seconds. | Optional, zero or empty for unlimited time. |
The Type column accepts six values: QCU for a single choice, QCM for a multiple choice, QCU_IMAGE and QCM_IMAGE for the same questions with image proposals, QCO for a free answer, HOTSPOT for hidden objects. The file accepts up to six text proposals per question, and four image ones.
Column headings are recognised regardless of accents and capitals, and several wordings are accepted for the same role. An unknown column is ignored and reported to you. Only a missing required column, one of the three, stops the import.
Once the file is taken in, a review opens as a full page, under the title "Import de questions" (question import), before anything is saved: nothing enters the store until you click "Importer".
Every row gets a status, "valides" (valid), "à compléter" (to complete) or "en erreur" (with errors), and the three counters at the top give the breakdown. The "Anomalies" (issues) column gives the reason, row by row, with the spreadsheet row number.
Two checkboxes govern the import. "Ne pas importer les questions en erreur" (do not import questions with errors) sets the red rows aside and lets the rest through. "Remplacer les questions des quiz existants" (replace the questions of existing quizzes) only appears when one of the quizzes in the file carries the name of a quiz that already exists; the names concerned are listed next to the box. The counter at the bottom shows how many rows will actually be imported.
One name means one quiz: matching is done on the name, regardless of accents, capitals and leading or trailing spaces. "Sécurité atelier" and "securite atelier" mean the same quiz. If the Quiz column is empty, the file name is used as the quiz name. Without the replace option, the rows are added after the questions already present: importing the same file twice adds the questions twice.
Exporting a quiz, fixing it offline, importing it back
The "Exporter (Excel)" button on a card produces a workbook in the template format, with two additions: one group of columns per translation language, whose headings carry the language code in brackets, and a last identifying column. You fix or translate in the spreadsheet, then take the same file back through the import button.
Deleting a quiz
The delete button on a card asks for confirmation and recalls the quiz name. Deleting takes all its questions and all their translations with it, and it is final. Export the quiz first, at the slightest doubt: the workbook you get is enough to recreate it.