

10Creating a story
The "Créer votre story" (Create your story) screen starts a story in a few choices. It opens from the "Stories" menu, through the "Créer" (Create) button at the top of the left-hand column, and fits on one page: the settings on the left, the scenes on the right. Here is the simplest order to fill it in.
- The story type: two cards, "Story 360°" (360° Story) in the general case and "Réalité Mixte" (Mixed Reality). This choice only appears if your account has "Réalité Mixte", and it is final. That second type has a section of its own: "Réalité Mixte" stories.
- The title: "Titre de la Story" (Story title), required, editable later. Just below, "Description de la Story" (Story Description), optional.
- Your scenes: under "Vos Scènes" (Your Scenes), the "Bibliothèque" (Library) button picks media already imported, and "Ajouter de nouveaux médias" (Add new media) uploads some on the fly (this second button is absent for a shared-library account). Each media file becomes a scene, in the order chosen. Each row carries four icons: "Placer avant" (Move earlier), "Aperçu" (Preview), "Placer après" (Move later) and "Supprimer" (Delete).
- The links between scenes: "Type de lien entre les scènes" (Link type between scenes) offers "Aucun" (None) to wire everything yourself, "Linéaire" (Linear) for an in-order sequence, "Menu" for free navigation from the first scene. The "Lien aller-retour" (Two-way links) switch adds the way back. Below the list, a navigation preview draws the scenes and their links, and redraws itself at every change.
- Look and start-up: in the left-hand column, "Couleurs" (Colors) with "Titres et boutons" (Titles and buttons), "Icônes" (Icons) and "Trames de fond" (Backgrounds); "Démarrage" (Startup) with "Message d'accueil" (Welcome message) and "Démarrage automatique" (Automatic start); and "Options" with "Afficher le bouton pause" (Show pause button) and "Utiliser le gyroscope de l'appareil" (Use the device's gyroscope).
- Creation: the "Créer" button, at the bottom, opens the story in the editor, with its scene links already in place. When greyed out, it says why: "Vous devez entrer un titre" (You must enter a title) or "Ajoutez au moins une scène" (Add at least one scene). The cross closes without creating anything.
Apart from the type, everything chosen here can be changed later in the editor: this screen is there to start fast, not to lock decisions in. A media file still uploading shows at the end of the list with its percentage and becomes a scene as soon as the upload is done. In "Réalité Mixte" there are no scenes to pick: the right-hand area explains what that type commits you to, under the heading "À savoir avant de choisir la réalité mixte" (Before choosing mixed reality).
Finding a story in the list
On the "Mes Stories" (My Stories) page, the left-hand column filters by "État" (Status) and by "Étiquettes" (Tags). The states offered are "Toutes" (All), "Publiées" (Published), "À mettre à jour" (To update) when there are any, and "Non publiées" (Unpublished), each with its count.
Above the list, the "Trier" (Sort) button opens a two-part menu: "Trier par" (Sort by), with "Date de modification" (Modification date), "Date de création" (Creation date) and "Nom" (Name), and "Ordre" (Order), with "Plus récentes d'abord" (Newest first) or "Plus anciennes d'abord" (Oldest first), "De A à Z" (A to Z) or "De Z à A" (Z to A) for the name. The option in use is ticked and your choice is remembered. Next to it, a button switches between "Vue grille" (Grid view) and "Vue détails" (Details view).
Reading a story's state without opening it
Each card carries two badges on its thumbnail. The first gives the story type, "360" or "Réalité Mixte". The second gives its state, in one word:
| State | What it means |
|---|---|
| "Brouillon" (Draft) | The story has never been published. |
| "Publiée" (Published) | The version that is live is up to date. |
| "Mise à jour à publier" (Update to publish) | The story has been changed since it was published: your visitors still see the previous version, until you click "Mettre à jour" (Update). |
| "Erreur" (Error) | A media file or a setting is missing, most often in an incomplete event. This state takes precedence over the other three. |
The detail per channel, web or headsets, is not on the card. It is read in the editor, at the top right: two badges, a globe for the web and a headset, each with a dot lit when the channel is live. It is also read in "Gérer la publication" (Manage publication), described in the section on publishing.
Finding the error that blocks publishing
Open the story. A red "Erreurs" (Errors) badge appears in the editor's top bar, and the "Lancer la scène" (Run scene) button is greyed out. The "Gérer la publication" button, however, stays clickable: it opens the same list of errors, headed by the message "La story ne peut pas être publiée tant que ces erreurs ne sont pas corrigées." (The story cannot be published until these errors are fixed.)
The red badge opens the "Erreurs de la story" (Story errors) window. Its header gives the number of errors. It groups them by scene, with a link to jump there, names the offending event and its number, says in plain words what is missing and suggests the fix.
When events point to a media file that no longer exists in the library, the bottom of the window says so and offers "Nettoyer les références perdues" (Clear the broken references), which empties all those slots at once.
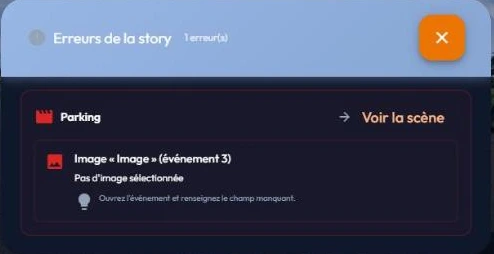
Without even opening that window, the offending event carries a red dot in two places: in the scene's event list, and on its row in the timeline, with the reason as a tooltip. In the scene list, the scene concerned carries a red icon as well. On a busy scene, that is the fastest way to spot it.
11Story card actions
On the "Mes Stories" (My Stories) page of the "Stories" menu, each story is a card. Its thumbnail carries the type, "360" or "Réalité Mixte" (Mixed Reality), and the state, whose meaning is detailed in Reading a story's state without opening it. Below the thumbnail: the title, the number of scenes, the date of the last change and the tags.
A click on the thumbnail opens the story in the editor. On hover appear a "Modifier votre story" (Edit your story) button, three icons and the three-dot "Actions" menu:
| Action | What it does |
|---|---|
| Modifier votre story (Edit your story) | The main button, with its label: opens the story in the editor. |
| Tester votre story (Test your story) | The play icon: tests the story full screen, in its current editing version (not the published one). If the story contains errors it is greyed out and its tooltip becomes "Corriger la story pour pouvoir la tester" (Correct your story to test it). |
| Gérer la publication (Manage publication) | Opens the publishing settings as a full page: web publishing, headset publishing, public link, share code, QR code. On a story in error, the icon is greyed out, with the tooltip "Corrigez les erreurs dans la story pour pouvoir la publier" (Correct errors on story to publish). |
| Mettre à jour (Update) | Pushes to an already broadcast story the changes made since, without touching the link or the share code. When greyed out, the icon says why in its tooltip: "Votre story est à jour" (Story already updated), "Votre story n'est pas publiée" (Your story is not published) or "Corrigez les erreurs dans la story pour pouvoir mettre à jour" (Correct errors on story to update). See Updating and stopping the broadcast. |
| Étiquettes (Tags) | In the three-dot menu: opens "Étiquettes de la story" (Tags of this story), to assign tags to the story and organise your list. The tags themselves are created through the "Modifier les étiquettes" (Edit tags) pencil, in the page's left-hand column. |
| Dupliquer (Duplicate) | Creates a full copy of the story, handy to derive a variant or experiment without risk. |
| Envoyer (Send) | Sends a copy of the story to another easystory360 account, identified by its e-mail address. The recipient accepts or declines from "Voir les Stories reçues" (Received stories); the story arrives unpublished. The entry is greyed out if your account does not hold the sending right: ask for it to be opened. |
| Supprimer la story (Delete) | Deletes the story but keeps its media in the library. |
| Supprimer la story et ses médias (Delete story and its media) | Deletes the story and removes its media from the library as well. This entry is absent for a shared-library account. |
Receiving a story someone sends you
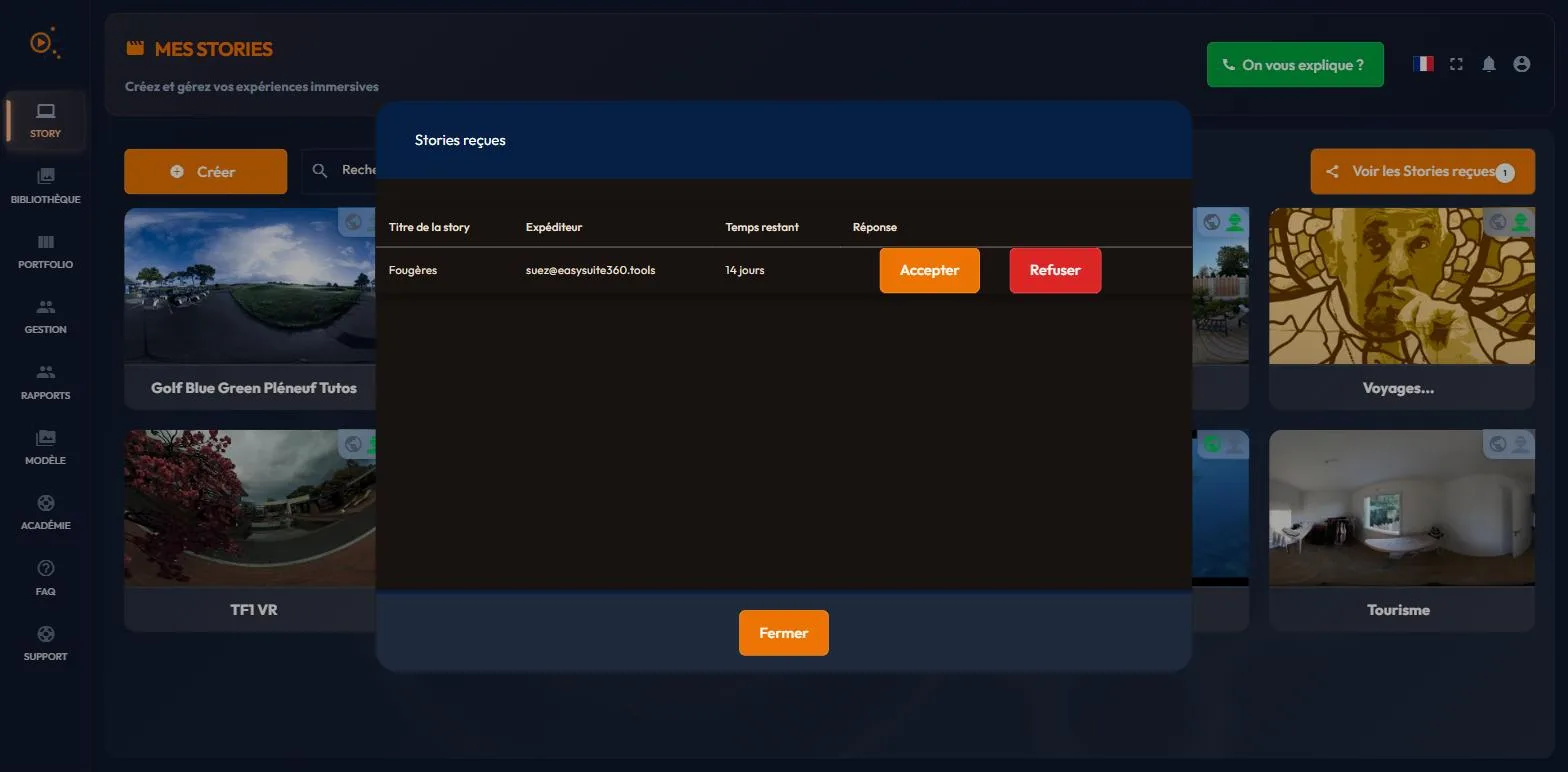
Sending has its counterpart: the "Voir les Stories reçues" button, in the header of the "Mes Stories" page. It only appears once a story is waiting for you, with their number as a badge.
It opens the "Stories reçues" (Received stories) panel, which gives, for each transfer, the story title, the sender, the time left to decide, and two buttons: "Accepter" (Accept) or "Refuser" (Decline). A transfer expires after fifteen days.
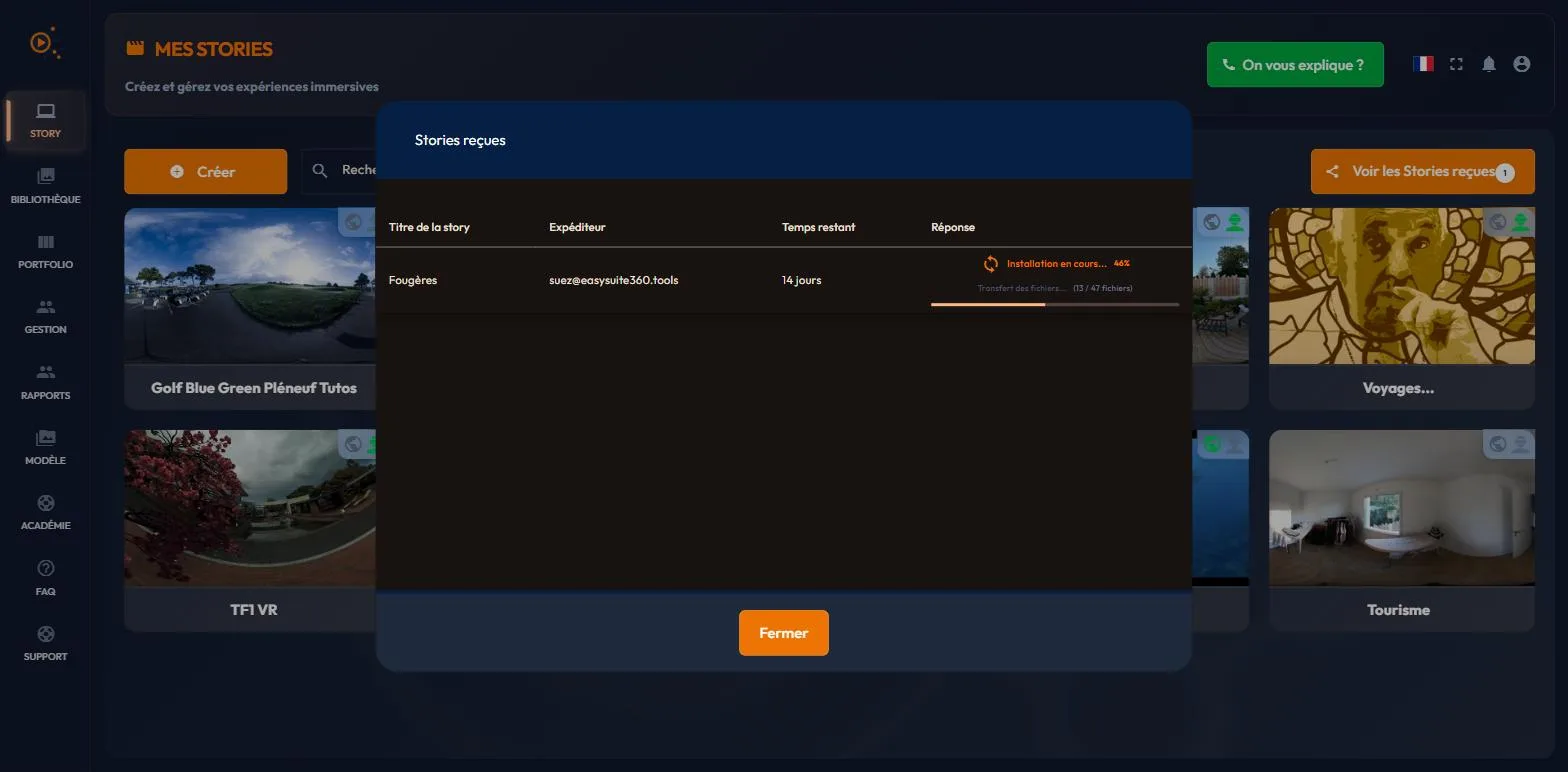
Accepting starts the installation, which is not instant: a progress bar reads "Installation en cours..." (Installing...) and counts down the file transfer, since every media file of the story is copied into your library. Wait for it to finish without closing the panel. The row then disappears from the list, and the story joins yours, in the "Brouillon" (Draft) state.
12The editor and its panels
The editor is the screen where a story is built. It opens when you click a story on the "Mes Stories" (My Stories) page, or through the "Créer" (Create) button of the "Créer votre story" (Create your story) screen. While it loads, a screen shows the steps, ticked off one by one, with a progress bar and an "Annuler" (Cancel) button.
The editor has neither the menu nor the header of the other pages. It has its own top bar, a rail of buttons on the left, the current scene in the centre with its timeline below, and the event list on the right.
The top bar
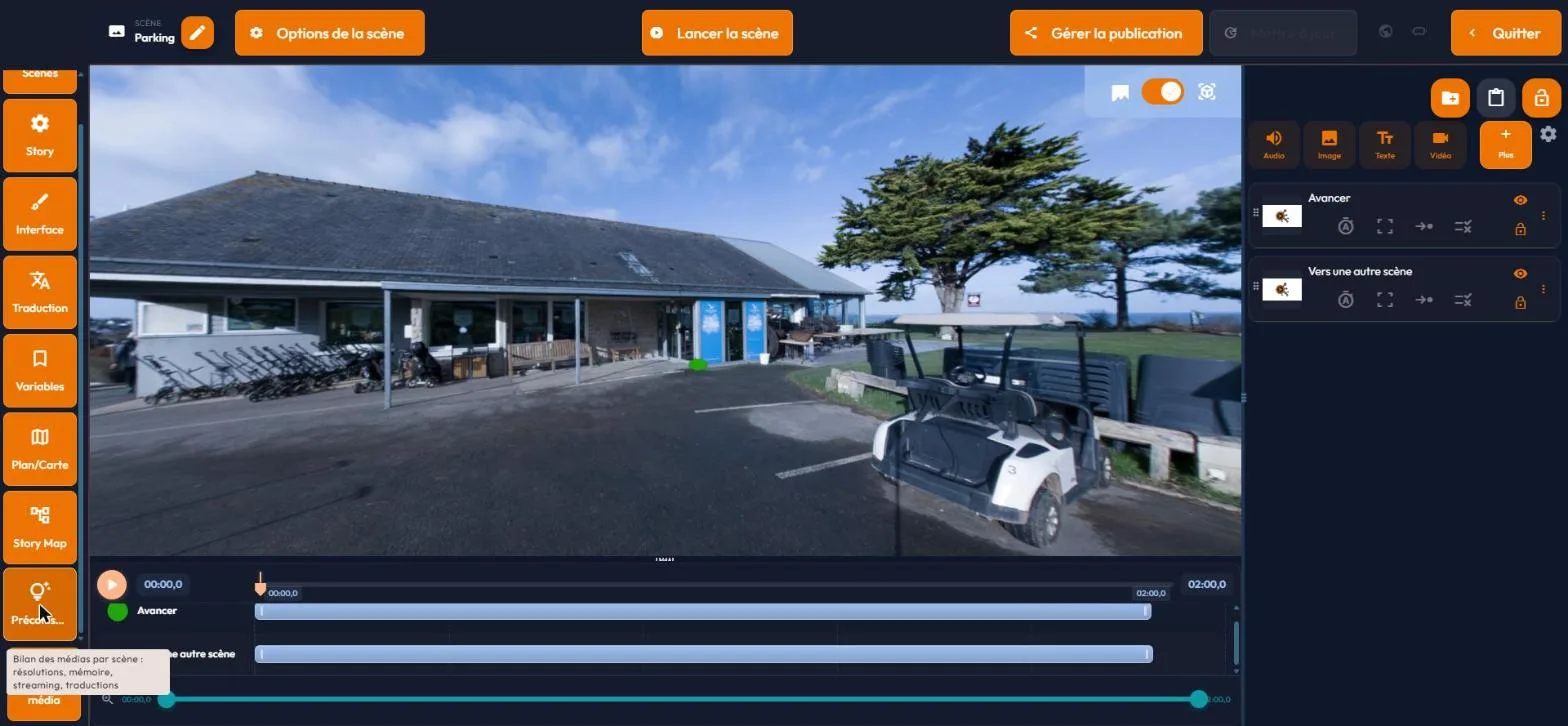
It fits on one line. On the left, a badge with the story's initials, its title in small type, and below it the title of the current scene: click it to rename the scene in place (Enter confirms, Escape cancels). Then come "Options de la scène" (Scene options), then "Lancer la scène" (Run scene), which plays the scene as the visitor will see it, and the red "Erreurs" (Errors) badge when the story holds any.
On the right, two badges say whether the story is published on the web (the globe) and on headsets, with a dot lit or unlit. Next come "Gérer la publication" (Manage publication), "Mettre à jour" (Update) and "Quitter" (Quit).
The left-hand rail
The rail lines up eight buttons. The first, "Scènes" (Scenes), opens or closes the scene drawer. The other seven each open a panel on the side, or a full page in the case of "Story Map". At the very bottom, a ninth button stays pinned: adding a media file to the library without leaving the editor (absent for a shared-library account).
| Button | What it opens |
|---|---|
| Scènes | The scene drawer, described below: the list of all your scenes, to move from one to another, add some, reorder them. |
| Story | Global options, in four tabs, "Général" (General), "Aperçu" (Preview), "Audio" and "Questionnaire": title, description, player colours and font, welcome message, automatic start, pause button, gyroscope, thumbnail image, ambient audio and question sets (for quizzes). |
| Interface | The player's dressing: logo (position, size, link), nadir image (the cover placed at the bottom of the 360 view), scene list shown to the visitor, contact details. |
| Traduction (Translation) | The story's multilingual version: each text is translated field by field, with AI assistance via a "Traduire" (Translate) button, and a text export for proofreading. |
| Variables | The "Gestion des variables" (Variable management) panel: creating and managing the trigger variables (true/false, number, text, stopwatch) used by event conditions. |
| Plan/Carte (Map/Plan) | The "Configuration de la carte" (Map Configuration) panel: the map or floor plan offered to the visitor to find their way through the story. See its own section. |
| Story Map | "Carte de la Story" (Story Map), as a full page: the story's graphic overview, detailed in the next section. |
| Préconisations (Recommendations) | The media review of your story, scene by scene: what is compliant, what could be improved, what must be fixed before publishing. Covered in its own section. |
The scene drawer
The drawer opens to the right of the rail. Each scene is a row: a numbered thumbnail, the title, the mention "360" or "Réalité Mixte", and the number of events. A click on a row opens the scene in the centre.
Three icons may be added: a house on the main scene, the one that opens the story, a flag on an end scene, and a red error icon, whose tooltip says what is missing. The house is a marker, not a button: it cannot be clicked.
- Add: "Nouvelle scène" (New scene), at the top of the drawer. The icon next to it, "Importez une scène d'un autre story" (Import scene from another story), brings in a scene from another of your stories.
- Search: the "Rechercher une scène..." (Search for a scene...) field filters the list. During a search, drag and drop is suspended.
- Look without changing scene: the magnifier on the thumbnail (tooltip "Aperçu" (Preview)) shows the scene's media enlarged, next to the row. A click elsewhere closes it.
- Reorder: drag the handle, on the right of the row.
- The three-dot menu: "Choisir comme scène principale" (Choose as main scene), which moves the house onto this scene, "Dupliquer la scène" (Duplicate scene) and "Supprimer la scène" (Delete scene), the last one greyed out when only one scene is left.
The timeline and the event list
Below the scene, the timeline lays out one row per event, in the colour of its type. On the right, the scene's event list carries the "Évènement" (Event) button and your favourite types, created in one click. An event's form also opens on the right, in place of the list. All of this is described in the section on events.
The "Erreurs" badge in the top bar lists blocking problems (missing media, incomplete quiz, empty link...) with, for each, a link that takes you to the scene to fix: see Finding the error that blocks publishing.
Adding a scene: check the media format
"Nouvelle scène" opens the "Créer votre scène" (Create scene) panel: a title, 50 characters at most, then the media picker, where you choose the backdrop. One click on a thumbnail picks the media file, a double-click opens it as a preview. Pills filter the library by type, and by format: "Tous formats" (All formats), "Immersif (360 / 180)" (Immersive (360 / 180)) or "Plat" (Flat). The button at the bottom is called "Créer".
The format filter matters: the picker shows every one of your media files, including those that do not cover the sphere. A flat media file belongs inside an event (a displayed image, a video in a window), but used as a scene backdrop it is stretched across the whole bubble.
Every immersive media card carries a "360" or "180" pill; a media file without that pill is a flat one. If you select one, an amber box appears below the title to warn you. It blocks nothing: you can still create the scene, knowingly.
13The story map
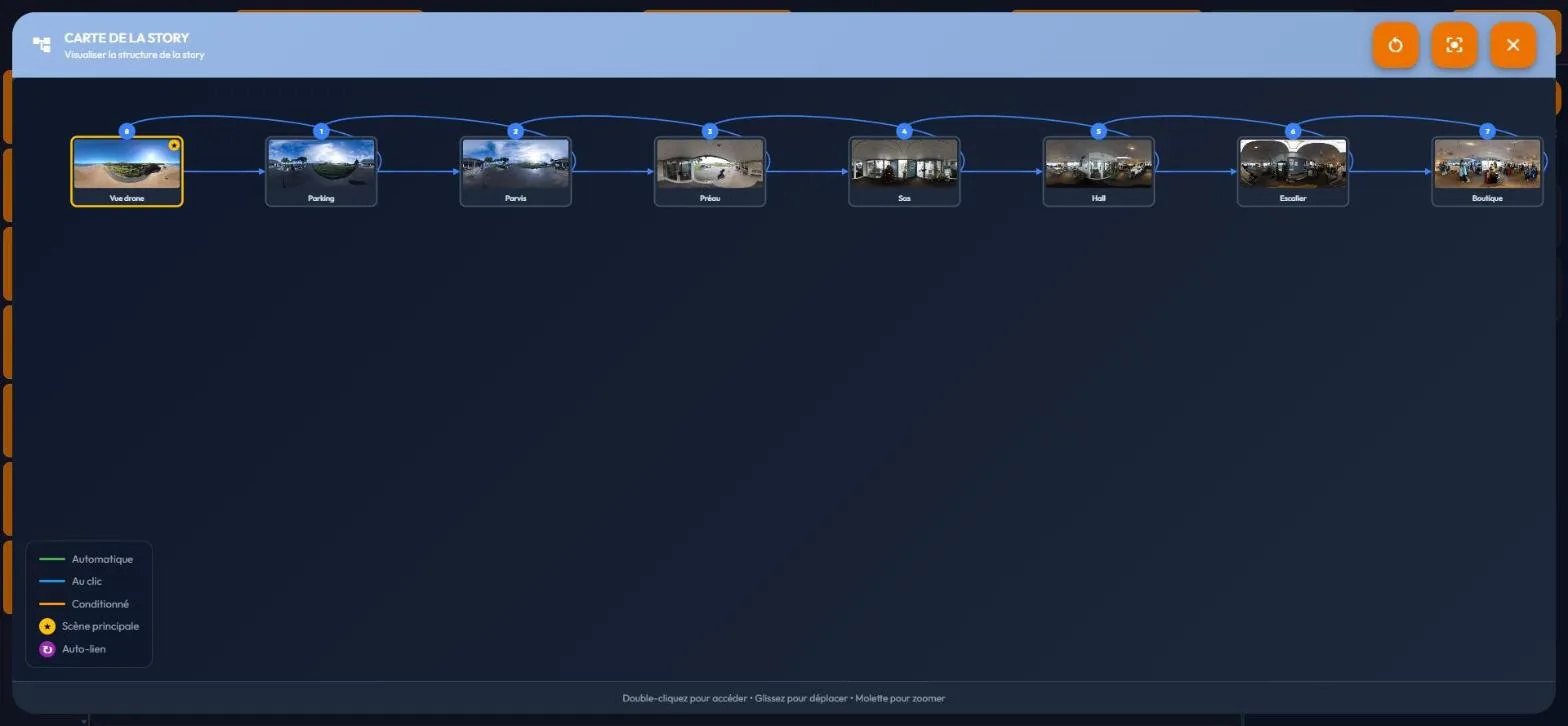
The Story Map draws your story as a diagram: each scene is a node, each link between scenes an arrow. It opens as a full page through the Story Map button in the editor's rail, under the name "Carte de la Story" (Story Map). It is the tool that makes a branching journey, an escape game or a multi-path training course readable at a glance.
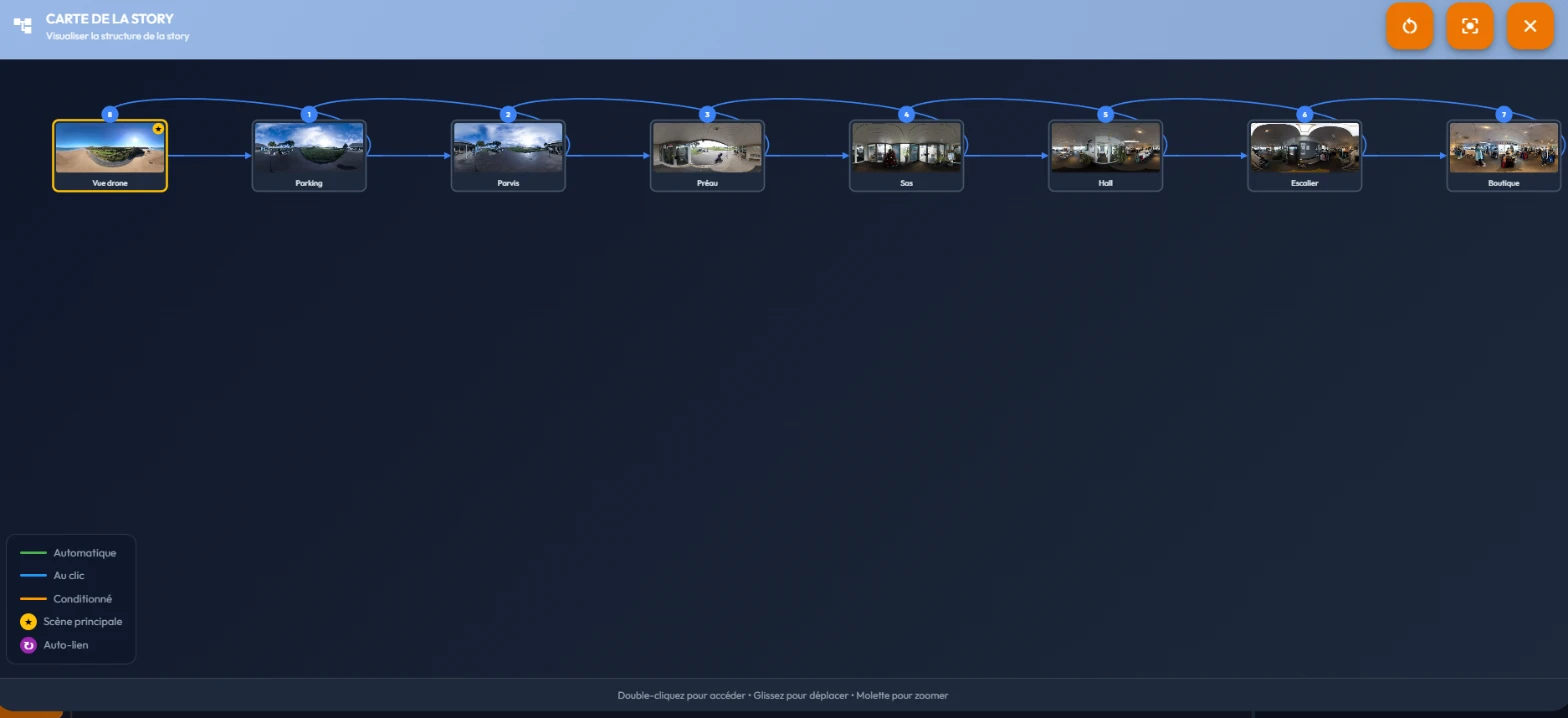
The legend distinguishes five situations:
- "Automatique" (Automatic): only draws the end-of-scene links inherited from older stories, a setting the editor does not offer. A "Vers une autre scène" (To another scene) event set to automatic activation is drawn as "Au clic", or as "Conditionné" if it carries at least one condition.
- "Au clic" (On click): the visitor triggers the jump themselves by clicking a point of interest.
- "Conditionné" (Conditional): the link only activates when conditions are met (variable, score, an event already opened...).
- "Scène principale" (Main scene): the experience's starting point, highlighted on the diagram.
- "Auto-lien" (Self-link): a scene pointing to itself, detected and flagged to save you from unintended loops.
Two things are never drawn: events hidden by the eye in the event list, and "Vers une autre story" (To another story) links.

On the diagram, a single click on a scene opens it in the editor: the bottom of the page says "Double-cliquez pour accéder" (Double-click to access), but one click is enough. Nodes can be dragged around, their positions are remembered per browser, and the mouse wheel zooms. Two icons in the header restore order: "Recentrer" (Reset view) for the view, "Réinitialiser le placement" (Reset layout) for the nodes. The cross closes the map.
14Maps and floor plans: giving the visitor a bearing
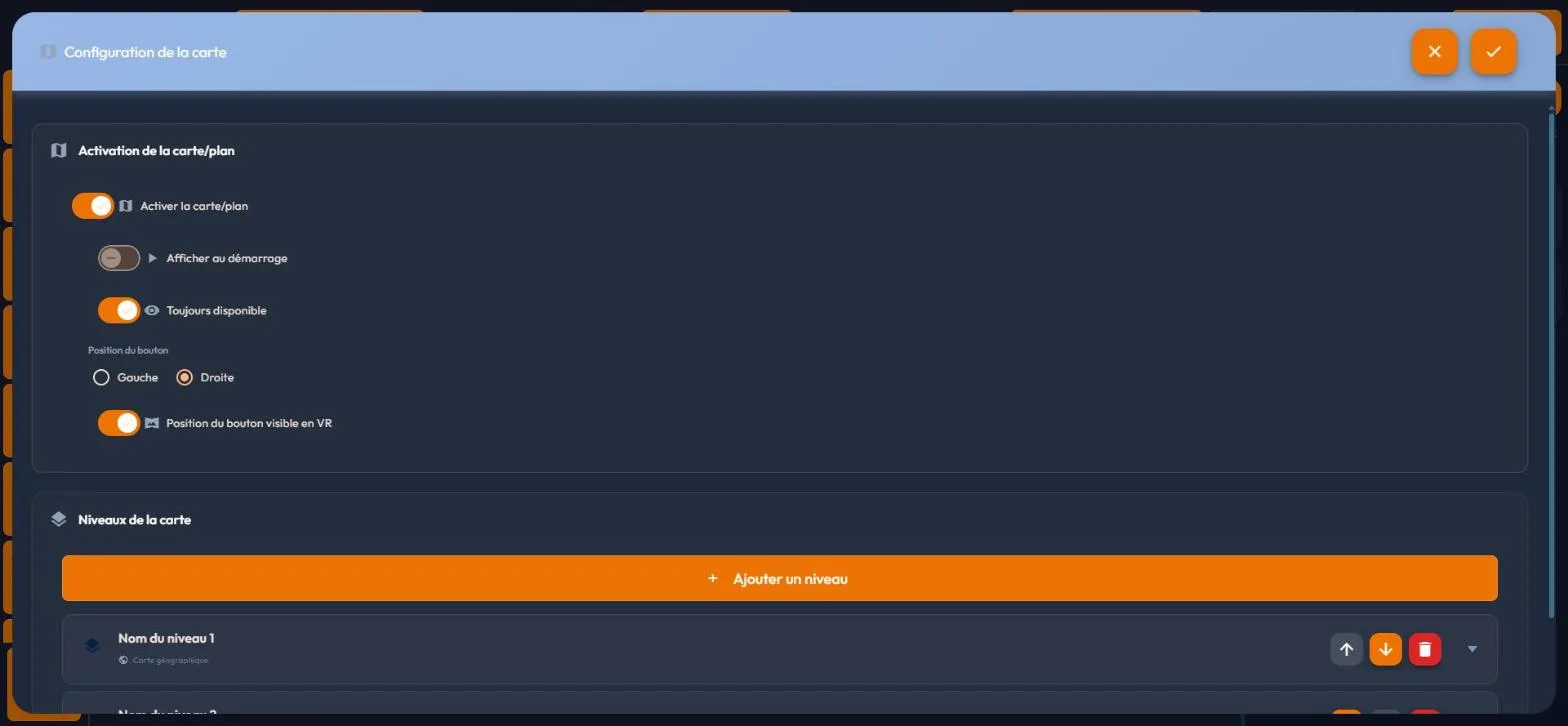
The floor plan and the map give the visitor, during the visit, an overview of where they are, with markers they can travel to. Everything is set in the editor: the "Plan/Carte" (Map/Plan) button in the rail opens the "Configuration de la carte" (Map Configuration) panel. While its first switch stays off, the panel shows nothing else: the feature is entirely optional.
Do not confuse it with the Story Map of the previous section, which is an author's tool and shows you the structure. Here, one single tool serves two uses: an interior plan imported as an image, or a geographic map of the real world.
Turning it on, and deciding how the visitor reaches it
The first block carries three switches, in cascade. "Activer la carte/plan" (Enable the map) opens the feature. "Afficher au démarrage" (Show at start) presents the map on entering the story, before the first scene.
"Toujours disponible" (Always available) puts a permanent button in the visitor's interface and reveals two more settings: "Position du bouton" (Button position), left or right, and "Position du bouton visible en VR" (Button position in VR), so the button exists in the headset too.
All three paths coexist, and an event can open a fourth (see below); the most discreet, and the most common, is the permanent button alone.
Levels, not a single map
The second block is called "Niveaux de la carte" (Map levels): you can stack several. A ground floor and an upper floor, a country map and a building plan, a site from above and a room seen from the top. "Ajouter un niveau" (Add a level) creates one, and each row carries three buttons on the right: up, down and delete. The order matters: it is the one the visitor moves through.
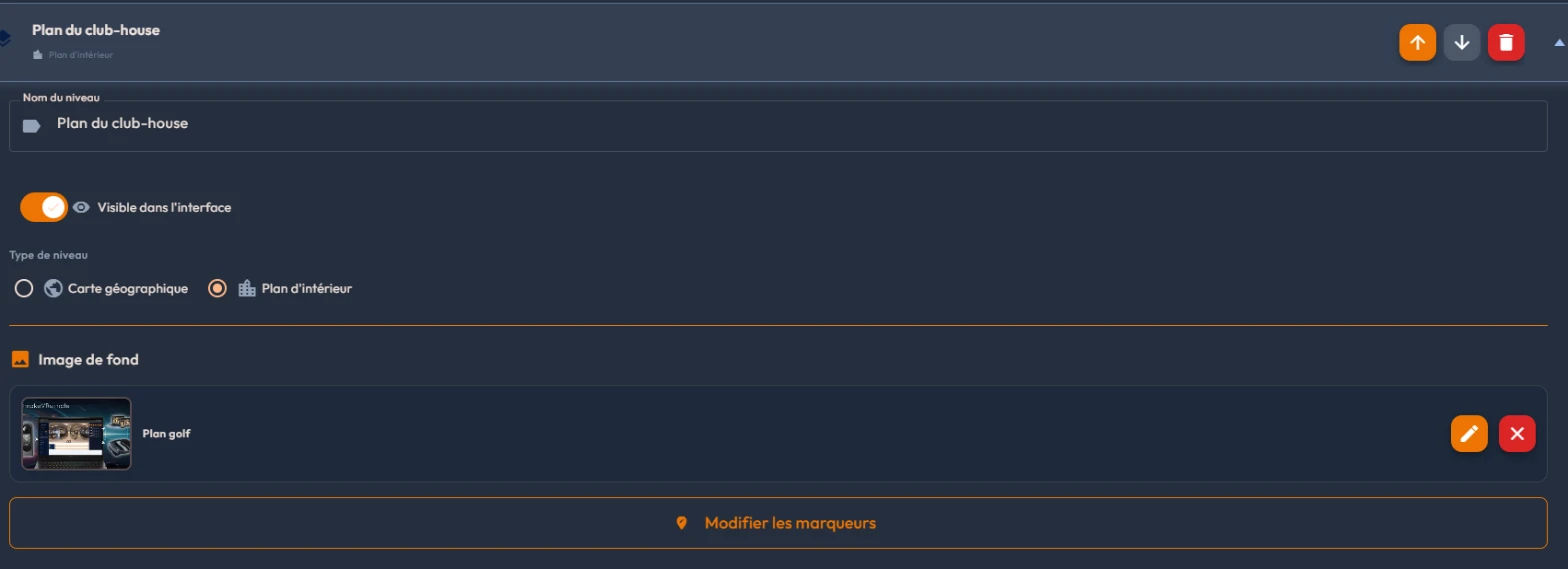
Expanded, a level asks for a "Nom du niveau" (Level name), a "Visible dans l'interface" (Visible in the interface) switch that lets you prepare a level without showing it yet, and above all a "Type de niveau" (Level type), which changes the rest of the form.
| Level type | What it expects | What it opens |
|---|---|---|
| "Carte géographique" (Geographic map) | Nothing mandatory: the world base map is provided. A "Fichier GPX" (GPX file) can add a track to it. | "Modifier les marqueurs sur la carte" (Edit markers on the map) |
| "Plan d'intérieur" (Interior plan) | An "Image de fond" (Background image) taken from your library: a plan, a diagram, a top view. | "Modifier les marqueurs" (Edit markers), greyed out until an image is chosen |
Placing the markers
The markers button opens a full-page editor: "Éditeur de niveau n" (Level Editor) for an interior plan, "Éditeur de carte géographique" (Geographic Map Editor) for a map. Both are laid out the same way: on the left the "Liste des scènes" (Scene List), on the right the plan or the map.
The list shows every scene in the story with, for each, its thumbnail, its title and its state: "Aucun marqueur" (No marker), or the role of the marker already placed, "Lien" (Link) or "Position". Four filters at the top of the list, "Toutes" (All), "Lien", "Position" and "Non liées" (Unlinked), show only linked scenes, those carrying a position, or those with nothing.
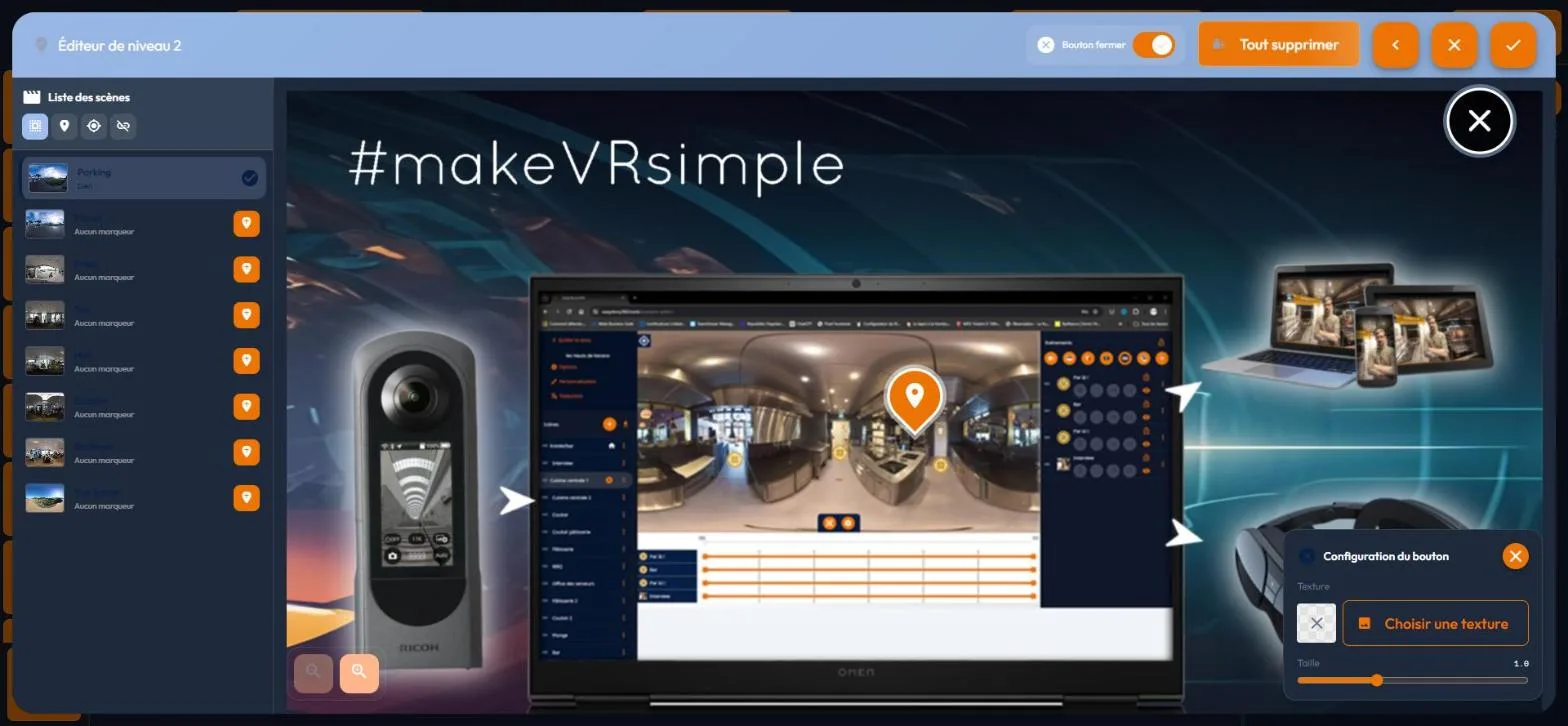
At the top of the editor, a few controls apply to the whole level. On a plan, the "Bouton fermer" (Close button) switch adds a cross on the image, the one that will let the visitor close the map, and opens a small "Configuration du bouton" (Button configuration) panel to give it a texture and a size. On a geographic map, "Centrer sur les marqueurs" (Center on markers) reframes the view.
In both cases, "Tout supprimer" (Delete all) removes every marker on the level at once, and an icon hides or shows the scene list. The "Enregistrer" (Save) button, at the bottom, keeps your work.
What a marker says
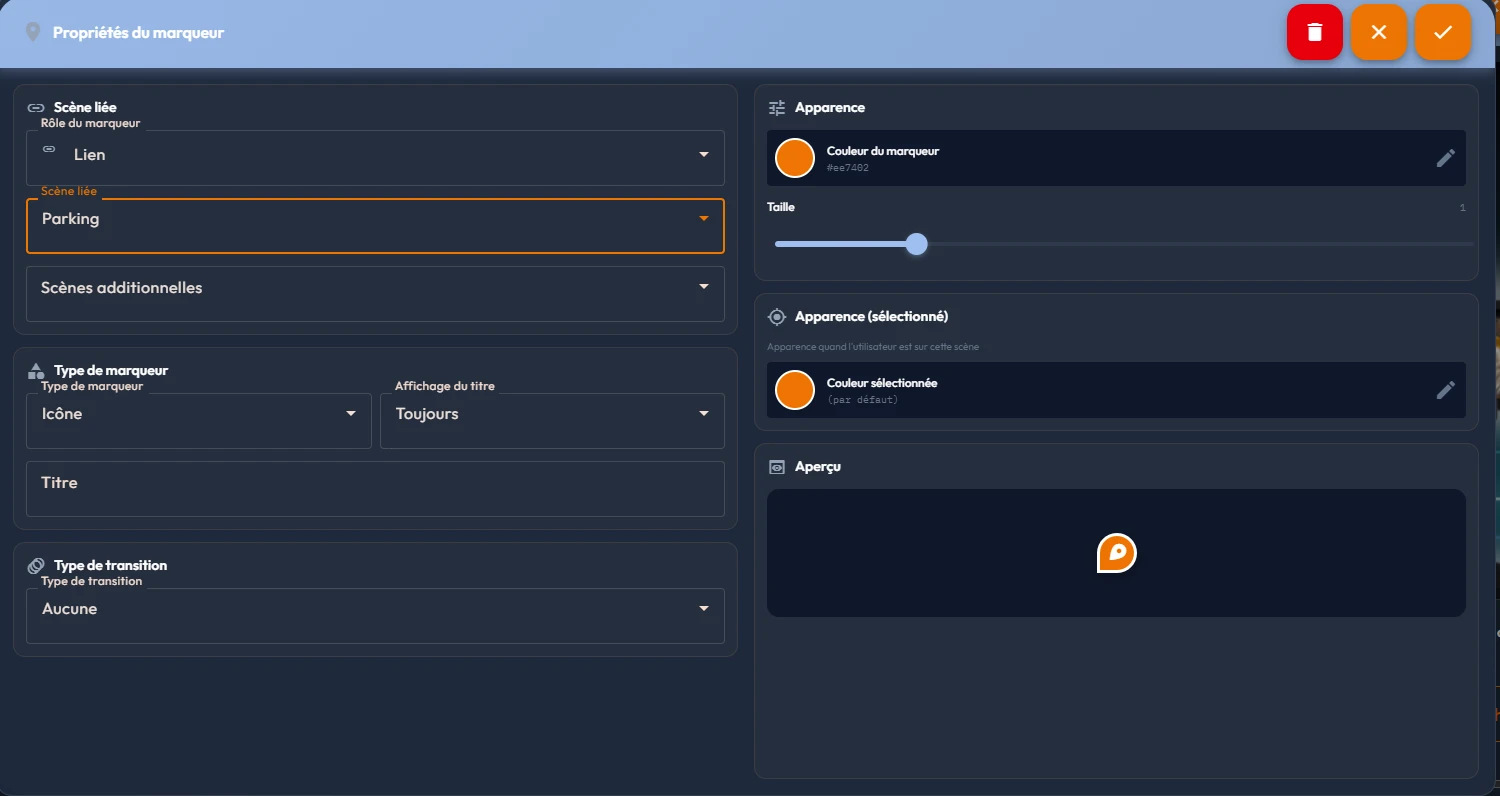
The "Propriétés du marqueur" (Marker Properties) panel opens on top of the editor and has two columns. On the left, what the marker does; on the right, what it looks like, with a live preview. Its "Enregistrer" button and its bin are in the header.
- "Rôle du marqueur" (Marker role): "Lien" links the marker to a scene, named just below by "Scène liée" (Linked scene): the visitor clicks the marker to go there. A "Scènes additionnelles" (Additional scenes) field attaches several to the same point, useful when one place on the plan matches several views. The other role, "Position", cannot be clicked: it marks where the visitor stands when looking at the linked scene, and its appearance cannot be set.
- "Type de marqueur" (Marker type): "Icône" (Icon) by default, or else an image, square or round. "Affichage du titre" (Title display) is set to "Toujours" (Always), "Au survol" (On hover) or "Jamais" (Never), with a free "Titre" (Title) field. With no title, the marker stays mute.
- "Type de transition" (Transition type): how the story switches to the linked scene. "Aucune" (None) is the starting value.
- "Apparence" (Appearance) and "Apparence (sélectionné)" (Appearance when selected): two colours and a size. The second applies "when the user is on this scene", which gives the visitor the marker of their own position.
Opening the map at the right moment
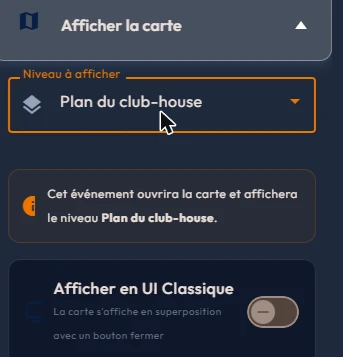
The permanent button is not the only way in. The "Afficher carte" (Show map) event, in the "Avancé" (Advanced) category of the catalogue, opens the map at a chosen moment, on a chosen level. Its settings block asks for a "Niveau à afficher" (Level to show), then states plainly what will happen: "Cet événement ouvrira la carte et affichera le niveau …" (This event will open the map and show level …).
One more switch, "Afficher en UI Classique" (Show in classic UI), sets the opening mode: the map then shows on top of the scene, with a close button. That choice only makes sense if the target level has that button, set in the marker editor. For the visitor, a crosshair marks on the plan the place where they stand, and a click on a marker takes them to the matching scene.
The "Configuration de la carte" panel and the two marker editors follow the rule of the rest of the editor: "Enregistrer" keeps your settings, the cross (tooltip "Annuler" (Cancel)) discards them. On the playback side, the plan and the "Afficher carte" event are played on the web and in headsets; the control tablet and the kiosk do not display them (see Compatibility by app).
15"Préconisations": the review of your media
The "Préconisations médias de la story" (Story media recommendations) panel reviews your story's media. It opens through the "Préconisations" (Recommendations) button in the editor's rail, just below Story Map. It changes nothing and forbids nothing: it goes through every media file placed in every scene, checks it against what the web and the headsets can take, and tells you what deserves a fix before publishing.
The review is recomputed every time you open the panel: what you read is the state of the moment.
Reading the panel
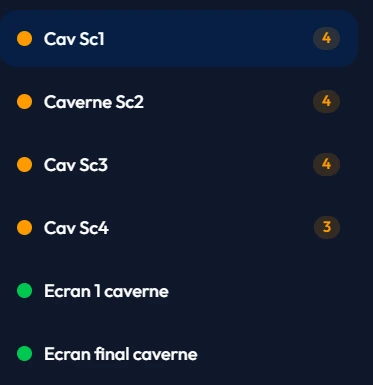
At the top, three pills sum up the whole story: the number of findings marked "à corriger" (to fix) in red, "recommandations" (recommendations) in orange, and "conformes" (compliant) in green.
On the left, the list of scenes that use at least one media file. Each carries a dot in the colour of its worst finding, followed by the number of red then orange findings. A scene showing no figure has only green findings. A scene with no media at all does not appear in the list.
On the right, the detail of the selected scene, one card per finding. The panel opens straight on the first scene to fix, failing that on the first one carrying a recommendation. The "Voir la scène" (go to scene) link, top right, closes the panel and drops you on the scene under review.
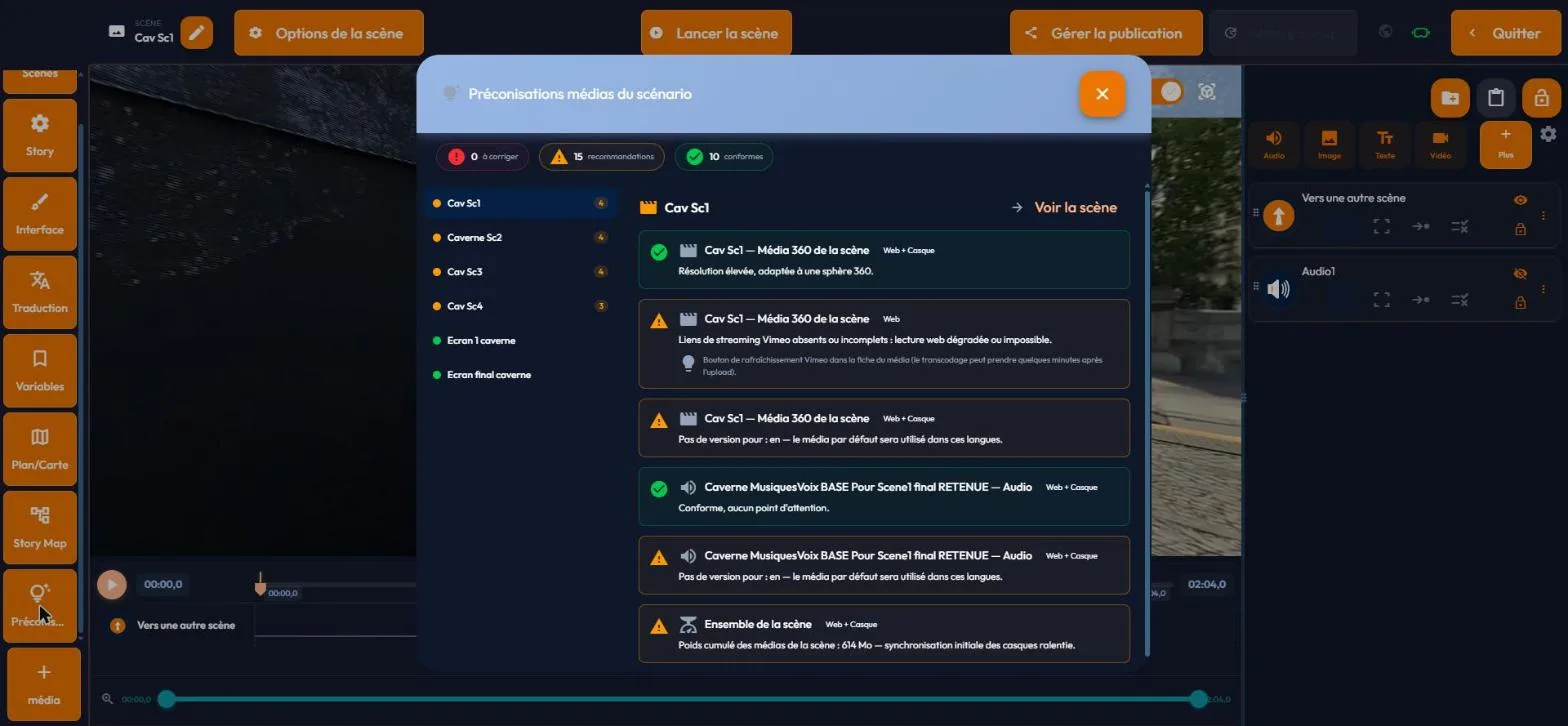
The three levels
- "Conforme" (compliant), green: nothing to do. The finding is there to confirm that the media was examined and fits within budget.
- "Recommandation" (recommendation), orange: the story will work, but perceived quality, reading comfort or loading time will suffer. Handle it if you can.
- "À corriger" (to fix), red: the problem will show. Handle it before publishing.
The channel label
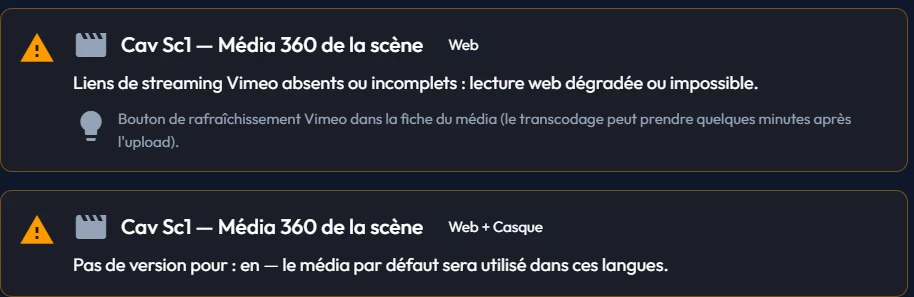
Every finding carries a label: "Web + Casque" (web and headset), "Casque" (headset) or "Web". It says where the problem shows. A finding labelled Casque has no bearing on web delivery, and the other way round. If you only publish on one channel, the other channel's findings do not concern you.
Two scopes
Most findings bear on one media file in one specific use: the media title, then the use made of it in the scene, for instance "Média 360 de la scène" (the scene's 360 media), "Vidéo (panneau)" (video on a panel) or "Audio d'ambiance de la scène" (the scene's ambient audio). The same media file used twice in the scene is examined twice, and one file can collect several findings at once: its resolution may be compliant and its translations missing.

Two findings bear on the whole scene and are shown under the name "Ensemble de la scène" (whole scene): the number of videos played at the same time, and the total weight of the scene's media.

What is examined, rule by rule
| What the platform looks at | What it tells you |
|---|---|
| A video placed on a flat panel for which a 1440p or 2160p version exists, or whose file is over 60 MB, without the headset optimisation option | To fix, Casque channel. The headset reserves decoding memory, in the order of 180 MB, for a definition the panel will never show. The tip: switch on "Utilisation de video optimise sur les casques" (use optimised video on headsets) on the media sheet, where 1080p is plenty. |
| The same video with the optimisation option on | Compliant. Decoding memory is under control. |
| A 360 video with a 2160p version or a file over 80 MB | Compliant. The resolution holds up on a sphere. |
| A 360 video below that threshold | Recommendation. In immersion the image is stretched over the whole sphere and perceived quality may disappoint. |
| Any video whose streaming links are missing or incomplete | Recommendation, Web channel. Web playback will be degraded or impossible. The tip: the refresh button on the media sheet, bearing in mind that preparing the file takes a few minutes after upload. |
| Several videos whose playback ranges overlap in one scene: three or four | Recommendation, Casque channel. Every video played at the same time takes its own memory. The tip: stagger the ranges on the timeline, or switch on headset optimisation for flat videos. |
| Five simultaneous videos or more | To fix, Casque channel. |
| An image over 10 MB | Recommendation. Slower loading and heavy texture memory. |
| An image over 25 MB | To fix. Reduce it before publishing. |
| An audio file over 15 MB | Recommendation. Compression advised. |
| A 3D object over 300,000 triangles | Recommendation, Casque channel. High rendering cost. |
| A 3D object over 800,000 triangles | To fix, Casque channel. |
| A 3D object with a texture over 6 MB | Recommendation, Casque channel. Reduce it: the texture downscaling option at import exists for that. |
| A 3D object whose file is over 40 MB | To fix, Casque channel. Long loading. |
| A sound or a video with no version in one of the story's languages | Recommendation. The default media will be served in those languages, and the missing ones are listed. |
| A scene whose media add up to more than 300 MB | Recommendation, on the whole scene. Initial headset sync will be slowed down. |
| A media file referenced by a scene but not found in the library | To fix. |
What the review does not do
- It fixes nothing. No button in the panel acts on a media file: you take note, you close, you go and fix things in the library or in the scene.
- It only examines media: the scene media, its ambient audio, its 3D object, and the media of Image, Vidéo, Diaporama, Audio, Objet 3D and Avatar events. Documents, geographic tracks and player styling images are not reviewed.
- It does not replace the story error indicator, which reports incomplete events.
16Scene options, tab by tab
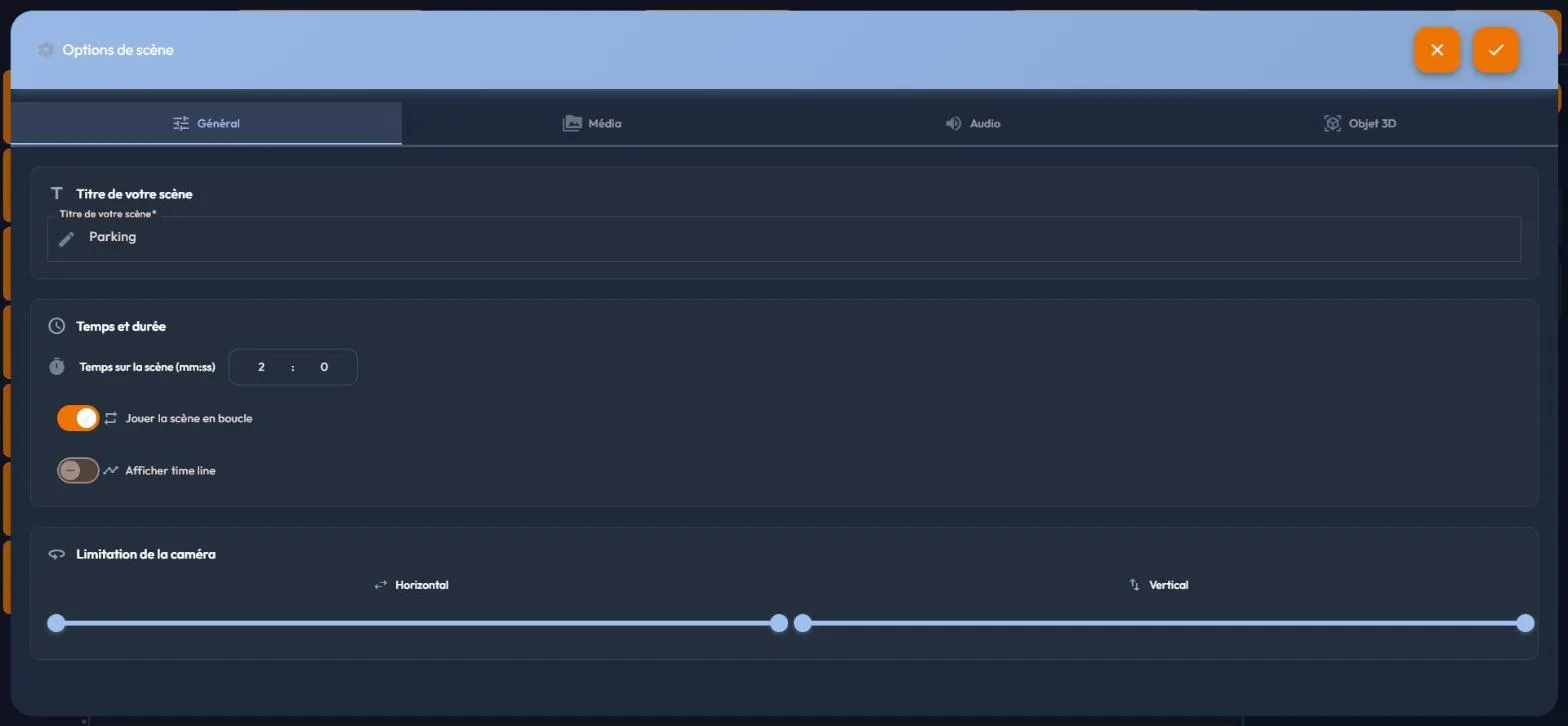
The "Options de scène" (Scene options) panel, followed by the title of the current scene, gathers the settings specific to one scene. It opens through the "Options de la scène" button in the editor's top bar, and is organised in four tabs: "Général" (General), "Média" (Media), "Audio" and "Objet 3D" (3D object). The panel opens on the left and the scene stays visible on the right. "Enregistrer" (Save), at the bottom, keeps your settings; the cross, or a click outside the panel, discards them.
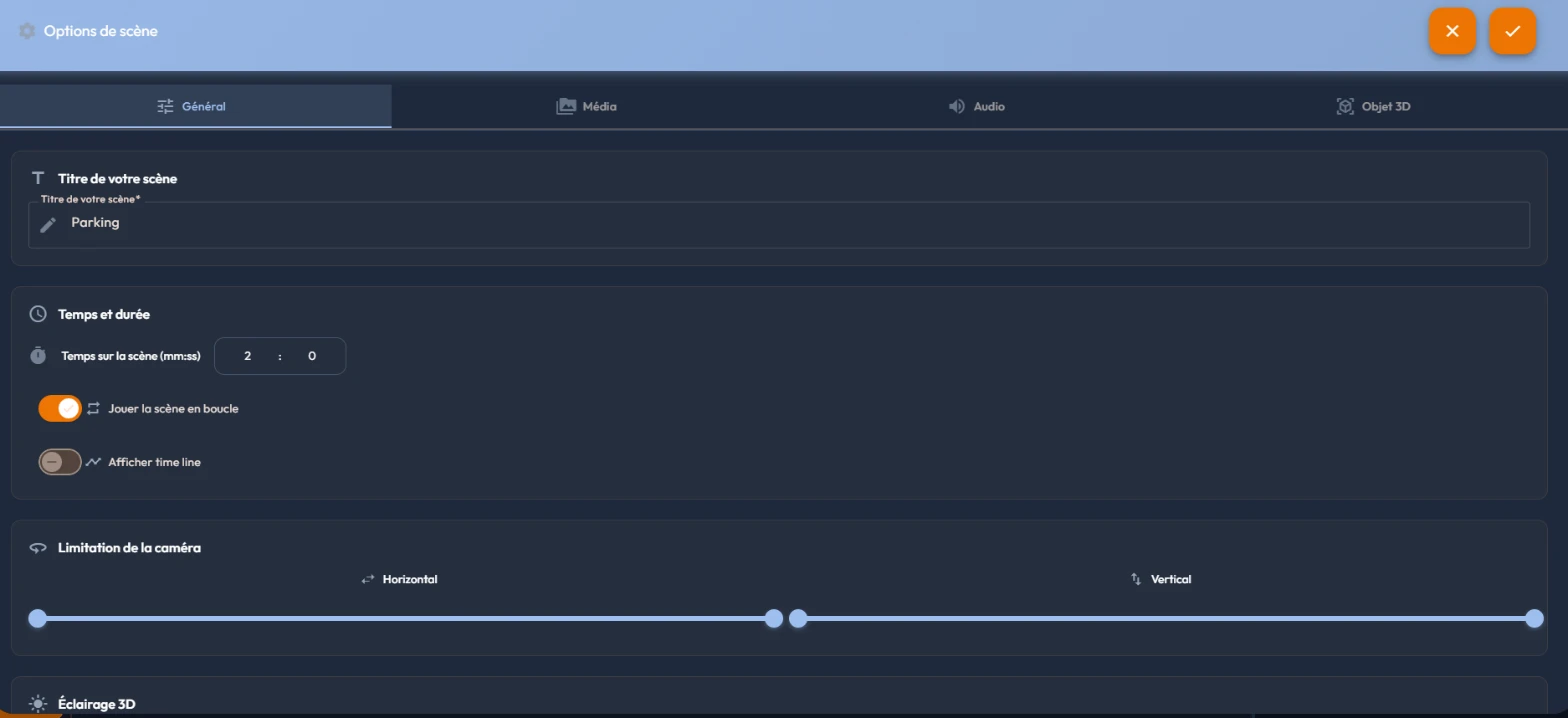
The "Général" tab
| Setting | Role | Values |
|---|---|---|
| Titre de votre scène (Scene title) | The scene's name, shown in the editor and in the player's scene list. | Required, 50 characters at most. The quick rename from the editor's top bar accepts 100. |
| Temps sur la scène (mm:ss) (Time in the scene) | The scene's duration. At 0 the scene is unlimited; otherwise a timer applies. If the backdrop is a video, its duration is taken over automatically. | Minutes and seconds; 0 by default. |
| Jouer la scène en boucle (Loop the scene) | Replays the scene once its time is up. | Yes/No; inactive (greyed out) when the time is 0. |
| Afficher time line (Show timeline) | Shows the visitor the scene's time progress bar. | Yes/No; greyed out when the time is 0. |
| Limitation de la caméra : Horizontal (Camera limit, horizontal) | Restricts the left/right rotation of the gaze between two angles, with a two-handle slider. | From -180° to +180°; no limit by default. |
| Limitation de la caméra : Vertical (Camera limit, vertical) | Restricts the up/down rotation of the gaze. | From -90° to +90°; no limit by default. |
In a "Réalité Mixte" (Mixed Reality) story, the tab also carries the "Type de scène" (Scene type), "Mixte (passthrough)" or "360 immersive (média)", described in "Réalité Mixte" stories.
3D lighting
An "Éclairage 3D" (3D lighting) section closes the "Général" tab. It only affects 3D objects placed in the scene. Its "Ambiance" (Ambience) setting offers four values: "Aucun" (None), which leaves the rendering untouched and is the default, "Studio", neutral and crisp, "Intérieur" (Indoor), warm, and "Extérieur" (Outdoor), in daylight.
Picking an ambience reveals three sliders: "Intensité" (Intensity), from 0.2 to 3, "Azimut" (Azimuth), from 0 to 360 degrees, which swings the light source around the scene, and "Élévation" (Elevation), from 10 to 90 degrees, which raises or lowers it. On a "Réalité Mixte" scene, an "Ombre au sol des objets 3D" (Ground shadow for 3D objects) switch is added, at a rendering cost on the headset.
The "Média" tab
Choosing the scene's backdrop from the library, with the same media picker as everywhere in the editor: search, pills by type with their count, pills by format ("Tous formats" (All formats), "Immersif (360 / 180)" (Immersive (360 / 180)), "Plat" (Flat)), tags, and the grid or list switch. If the backdrop is a video, a volume slider appears. The media file chosen stays visible under the "Sélection" (Selection) heading.
The "Audio" tab
The scene's own ambient sound: same search and filter tools, plus a volume slider. Clicking the selected audio again removes it.
The "Objet 3D" tab
Choosing a 3D object from the library to display in the scene, with the same selection tools.
172D view and 360 view: two working modes
The editor's viewer displays your media in two ways, and the current mode determines which tools are visible. You switch with a button at the top right of the viewer. It applies to 360 stories: a "Réalité Mixte" (Mixed Reality) story always works in 3D view, and the switch is not offered there.
- The 2D view unfolds the 360 media flat, like a world map. It is the editing mode: you place events precisely and set the initial point of view. Camera limits, on the other hand, are only set in the "Options de la scène" (scene options), and nothing draws them here. The whole sphere is visible at once, nothing can hide behind your back.
- The 360 view shows the navigable spherical preview, as the visitor will see it. It is the checking mode: you verify the real effect of events, fine-tune their position, and it is the only mode where 3D objects and avatars are displayed.
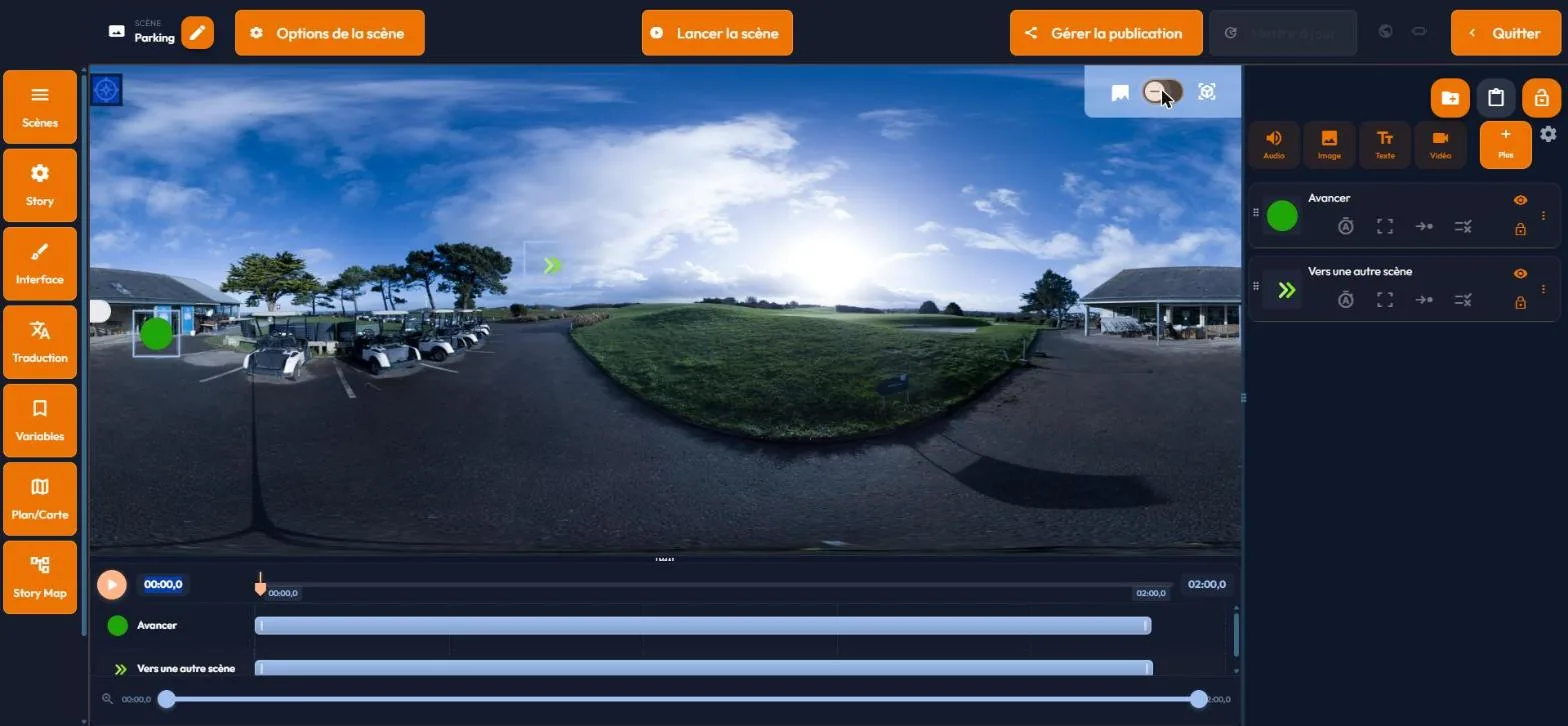
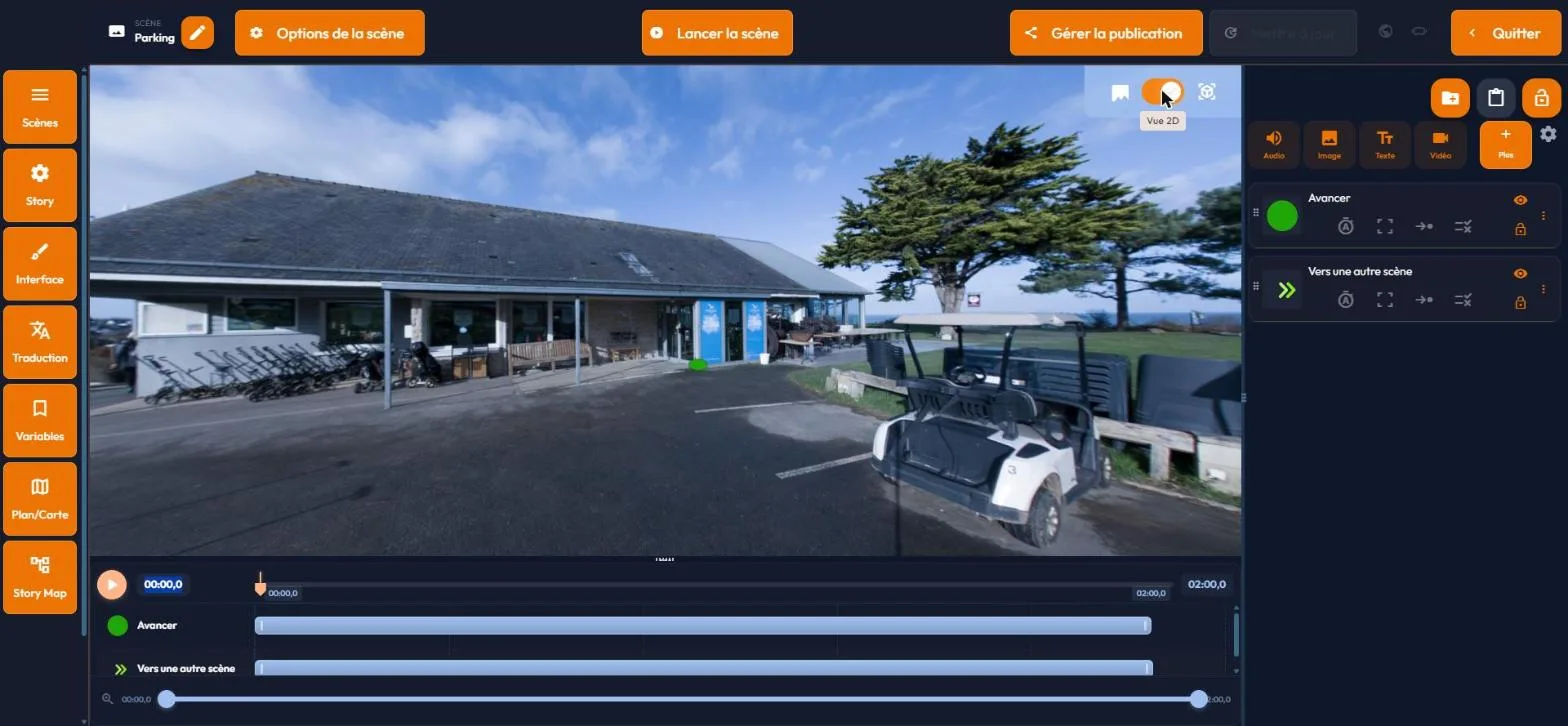
18The initial point of view
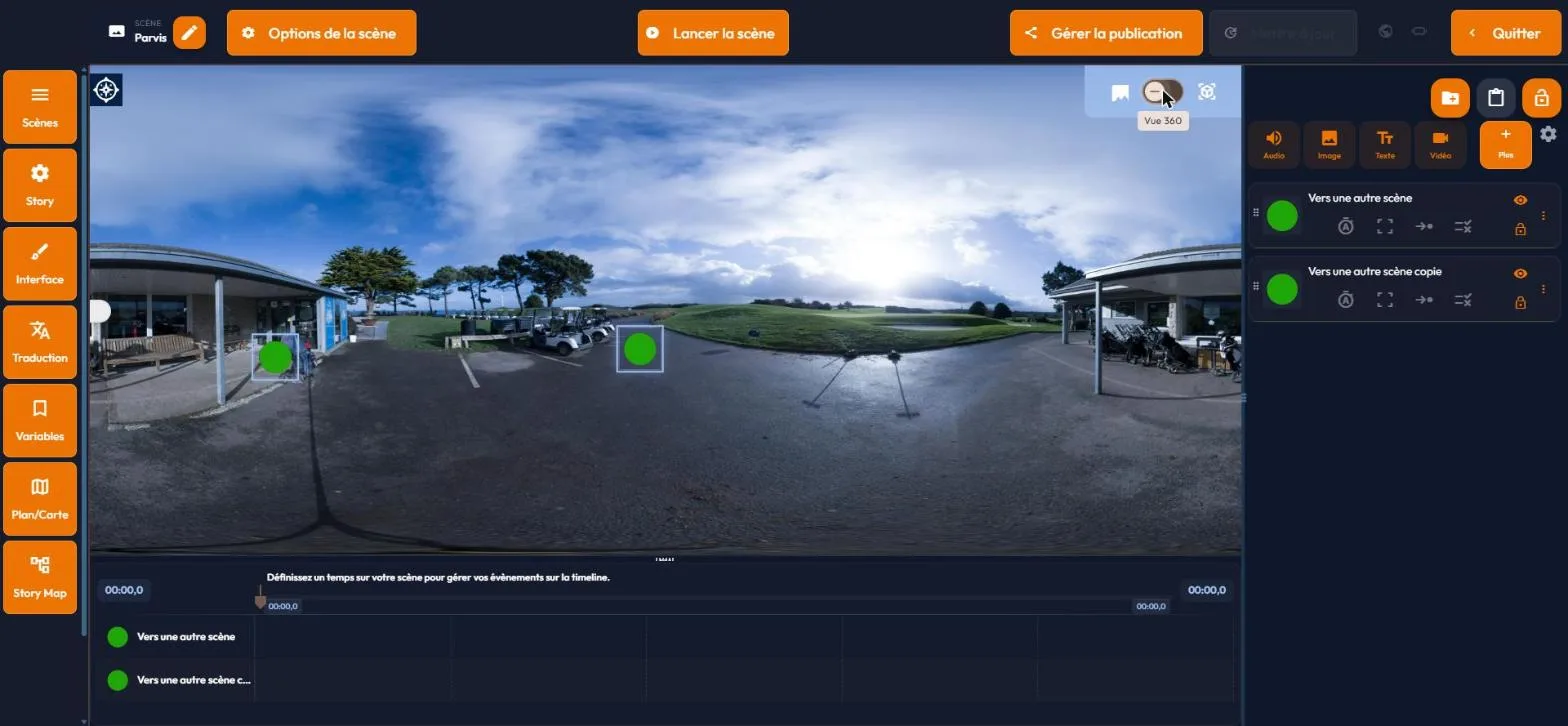
The initial point of view is the direction of the visitor's gaze when the scene opens. It is a decisive setting: it steers attention from the very first second. It is set in the editor's viewer, in the 2D view, through the compass icon.
- Switch the viewer to the 2D view using the selector in the top right. The panorama unrolls flat, and a compass appears in the top left.
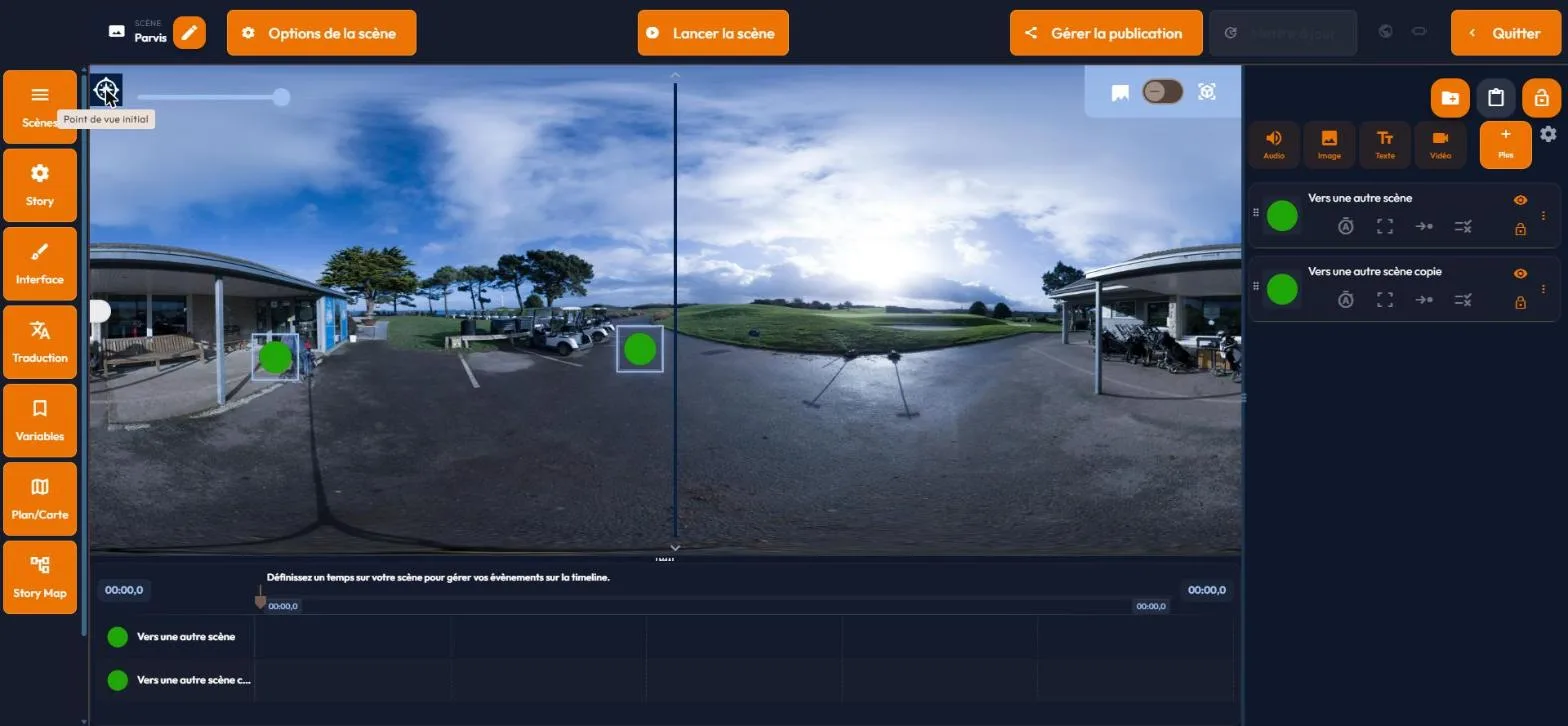
- Click the compass. Its tooltip confirms: "Point de vue initial" (Initial point of view).
- A horizontal slider unfolds at the top of the viewer, and a vertical marker crosses the panorama: it shows the starting direction of the gaze. The setting only covers the horizontal angle, from -180 to 180; there is no gaze height to set. That horizontal orientation, and it alone, is also what headsets apply (see Compatibility by app).
- Move the marker where you want it, then switch back to the 360 view to check: the scene opens facing that point.
19"Réalité Mixte" stories: building inside a real room
A "Réalité Mixte" (Mixed Reality) story does not take place inside a photographed sphere, but in the real room where the visitor stands. You describe that room in the platform, its dimensions, its doors, its furniture, then you place content in it at precise spots, in metres.
This story type is what drives the mediation setup our commercial offer calls easypop360; inside the platform it carries one name only, "Réalité Mixte", and that is the one this wiki uses throughout.
"Réalité Mixte" is chosen when the story is created, in "Stories" > "Créer" (Stories > Create), through the "Réalité Mixte" card; that choice cannot be changed afterwards. The feature is an experiment, granted by invitation, as part of a research and development project supported by the Région Bretagne. The first setup in service is the one at the Centre de création contemporaine Olivier Debré, in Tours.
If your account does not have it, the "Réalité Mixte" card does not appear, and nothing that follows exists in your interface: no "Pièce" (Room) panel, no zone triggers, no extra conditions, no special video settings.


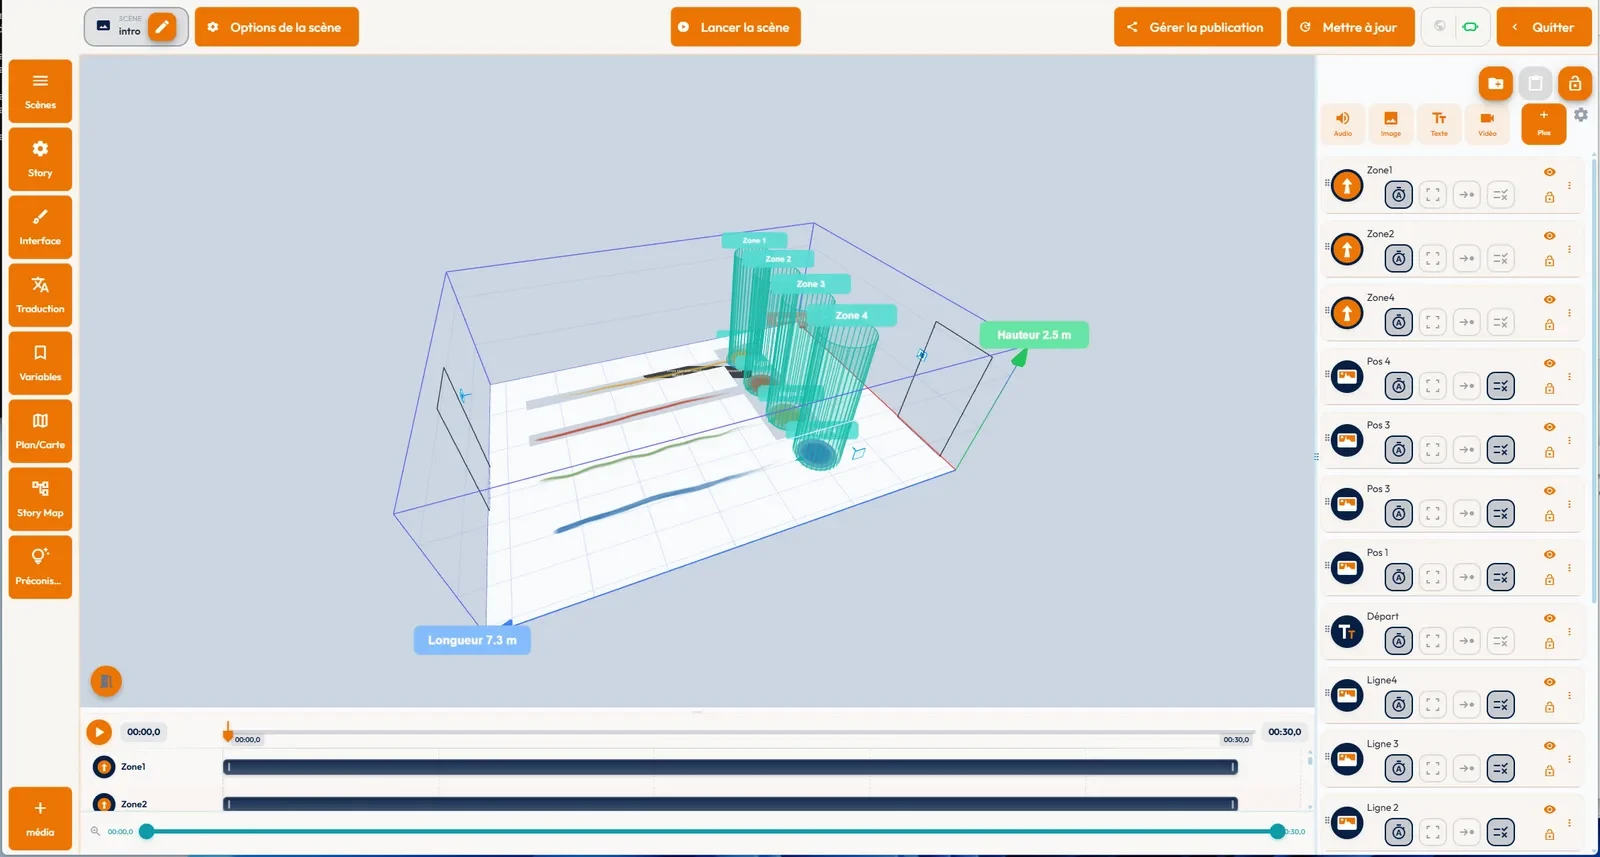
What a "Réalité Mixte" story changes
- What you keep: the title, the description, the player's three colours, events, conditions, variables, question sets. All the vocabulary of the previous part still applies.
- What disappears: the choice of scene media at creation and the scene-to-scene navigation offered by the wizard. In a mixed scene, the 2D view and the viewer's preview mode disappear as well: there the editor always works in 3D view.
- What appears: the "Pièce" panel and its eight sections, two more trigger modes, mixed reality volumes on 3D objects, visual effects, appear and disappear animations, following an event, and two condition types.
Creating the story
In the "Stories" menu, the "Créer" button shows two cards side by side. On the left, "Story 360°", described as "Créez des scènes avec des médias 360° immersifs" (Create scenes with immersive 360 media). On the right, "Réalité Mixte", described as "Expérience sans scène, contenu en réalité augmentée" (Scene-free experience, augmented reality content).
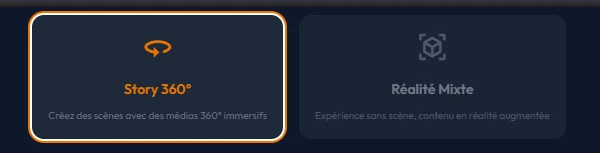
Choosing the right-hand card shortens the screen: the two numbered steps disappear, so does the media selection, and the scene navigation block with it. All that remains is the title, which is required, the description and the three colours.
Despite the words "Expérience sans scène", a first scene is indeed created for you, with no media; its thumbnail in the scene drawer is a generic icon. You then work in the same editor as anywhere else, with a scene drawer, a timeline and events, the viewer being forced into 3D view and the "Pièce" panel added.
You can add more scenes: the "Nouvelle scène" (New scene) panel then asks for a "Type de scène" (Scene type), "Mixte (passthrough)" or "360 immersive (média)". A mixed reality story can therefore contain 360 scenes: a scene without media plays in the real room, a scene with a 360 media file immerses the visitor in the image.
The same choice is found in the scene options, "Général" tab. To go back from a 360 scene to the room, the "Vers une autre scène" (To another scene) event offers the "Fondu vers le réel (passthrough)" (Fade to the real world) transition.
The "Pièce" panel
A door-icon button in the scene editor opens the "Pièce - réalité mixte" (Room, mixed reality) panel. It only appears in mixed reality and only in 3D view. Everything there is set live: every gesture redraws the preview, and the value is saved when you release the slider.
The room dimensions are set here, not in the scene options, which keep their own settings (duration, audio, camera limits). The settings belong to the current scene, with one exception: the route lines, which apply to the whole story and are covered in the next section.
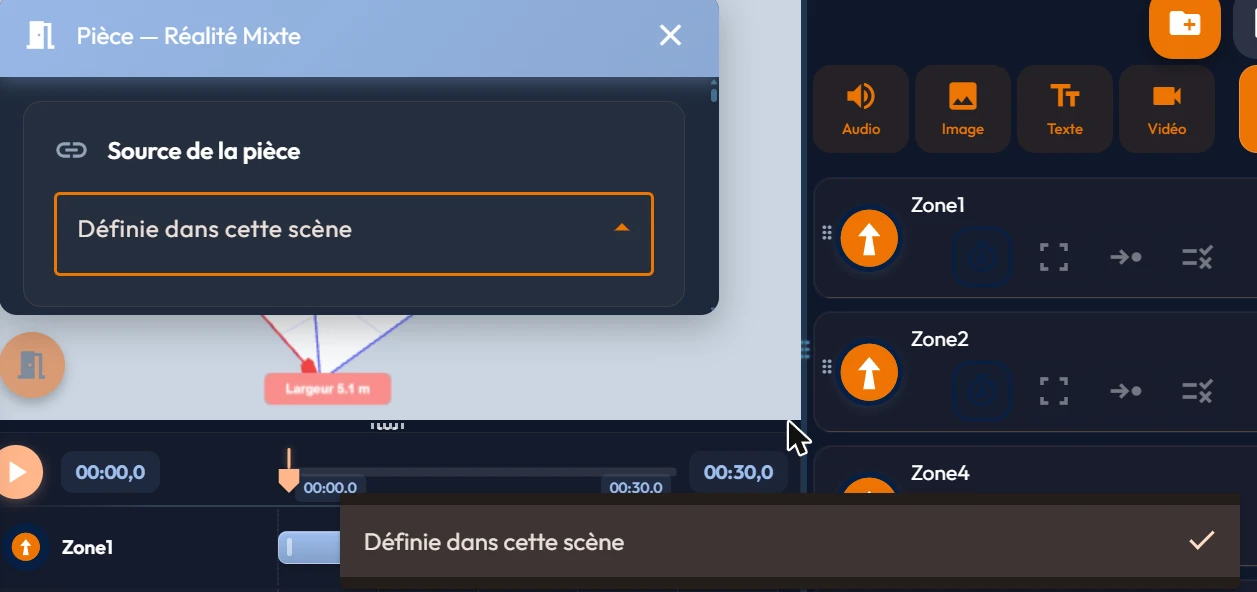
| Panel section | What you set there |
|---|---|
| "Source de la pièce" (Room source) | A list: "Définie dans cette scène" (Defined in this scene), or "Liée à" (Linked to) another scene. When a link is active, the Pièce, Ouvertures, Obstacles, Marqueurs and Habillage sections vanish from the panel: the linked scene carries them, and its changes are followed. Zones and the line frame stay specific to this scene. |
| "Reprendre la pièce d'une autre story" (Take the room from another story) | Two lists, a story then one of its scenes, two switches, "Zones" and "Lignes multi-joueurs" (Multiplayer lines), and an "Importer" (Import) button. It is a copy: the source story is not modified, and its future changes will not be reflected here. |
| "Pièce" (Room) | Width and Length from 1 to 30 metres in 10 centimetre steps, Height from 2 to 10 metres in 5 centimetre steps. By default, a room 10 metres by 10, 3 metres high. The "Grille fine (10 cm)" (Fine grid) switch tightens the on-screen grid, for the time it takes to place something to the centimetre; it is not saved and comes back off every time you open the panel. |
| "Ouvertures" (Openings) | Two buttons, "Ajouter une porte" (Add a door) and "Ajouter une fenêtre" (Add a window). Per opening: the wall (front, back, left or right), the kind ("Porte vide" open doorway, "Porte pleine" solid door, "Fenêtre" window), the "Position sur le mur" (Position on the wall), Width, Height, and for a window only the "Allège" (sill height). |
| "Obstacles" | Three buttons, "Ajouter un mur intermédiaire" (Add a partition wall), "Ajouter un meuble plein" (Add a solid piece of furniture), "Ajouter une table" (Add a table). Per obstacle: the type, the shape for a table ("Rectangulaire" or "Ronde", round), X and Z positions, a Rotation from 0 to 360, Width or "Diamètre" (Diameter), "Épaisseur" (Thickness) or "Profondeur" (Depth), Height, plus a texture from your image library, with "Répéter" (Repeat) and two repetitions per axis. Obstacles simulate the real depth of the place. The "Masque les objets virtuels" (Hides virtual objects) switch, to be turned on for furniture really present, makes that furniture hide the virtual objects located behind it; the volume stays invisible in the headset. |
| "Zones" | The "Ajouter une zone" (Add a zone) button. Per zone: a Name of 30 characters at most, a "Cercle" (Circle) or "Rectangle" shape, X, Z and Y positions, then a Radius, or a Rotation, a Width and a Depth. The "Hauteur (0 = pièce)" (Height, 0 = room) field takes the volume up to the ceiling when it is zero. A zone is born as a circle 1 metre in radius, in the middle of the room. These zones are what the "Zone" activation mode targets. |
| "Marqueurs" (Markers) | Calibration markers, drawn as flags in the preview. The "Ajouter un marqueur" (Add a marker) button. Per marker: a Name, a "MarkerId", a whole number unique within the room and offered at the first free value, X and Z positions, "Position Y (hauteur)" (Y position, height), and the three rotations. Collapsed, a marker reads "Nom - Id n". |
| "Lignes multi-joueurs" (Multiplayer lines) | The parallel routes followed by several headsets in the same room. Covered separately, in Several visitors in the same room. |
| "Habillage" (Surfaces) | A "Plafond" (Ceiling) switch, off by default, then one row per surface in the order Floor, Front wall, Back wall, Left wall, Right wall, Ceiling. Per surface: "Visible", a texture from the library, "Répéter" and two repetitions per axis. |
Placing content in the room
Events are placed as they are in a 360 story, with one detail that changes everything: their coordinates are not degrees but metres, counted from the corner of the room, in 10 centimetre steps. You do not say "45 degrees to the right", you say "3 metres from the back wall and 2 metres from the left wall".
The Objet 3D (3D object) event gains a "Réalité mixte" block with two switches: "Objet de réalité mixte" (Mixed reality object) and "Trigger", the latter left untranslated in the French interface. When the first is on, the 3D model choice, the size setting, the ground-placement switch and the Animation block disappear, replaced by a "Taille du volume" (Volume size) with three sliders X, Y and Z, from 0.1 to 10 metres.
A mixed reality object is therefore not a model the visitor sees: it is an invisible interaction volume. The second switch makes it a trigger, usable by the "Trigger" condition.
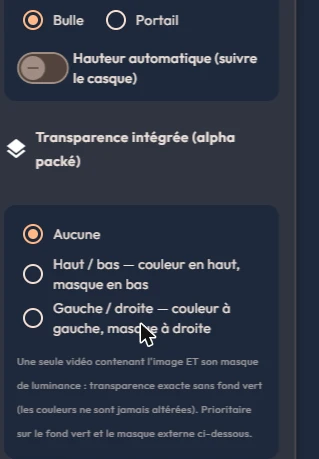
The Vidéo (Video) event accepts both flat videos and 360 videos here, and gains several settings: a "Vidéo 360" switch, a "Container vidéo" (Video container) set to "Bulle" (Bubble) or "Portail" (Portal), and a "Hauteur automatique (suivre le casque)" (Automatic height, follow the headset) with an "Amplitude" slider from 0 to 1 metre.
When the container is a portal, a "Scène de destination au franchissement" (Destination scene when crossing) list turns the door into a passage to another scene; its default option, "Aucune, immersion dans la vidéo" (None, immersion in the video), lets the visitor step into the video itself. The physical width of the door, from 0.6 to 3 metres, also bounds the crossing area on the headset.
The Texte (Text) event, finally, changes its unit of measure: the panel says so itself, "1 unité = 1 cm en Réalité Mixte" (1 unit = 1 cm in mixed reality).
Triggering by movement
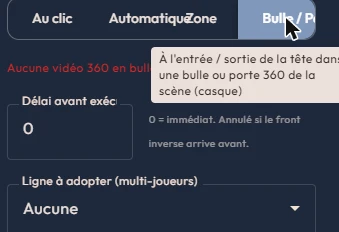
Event activation here counts four buttons instead of two: "Au clic" (On click), "Automatique" (Automatic), "Zone" and "Bulle / Porte" (Bubble / Door), the last two coming with a "Délai avant exécution (s)" (Delay before execution, in seconds). They are described in full in The four activation modes.
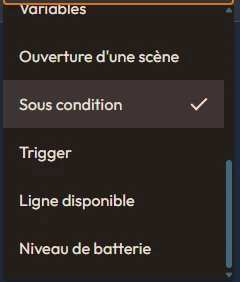
On the conditions side, two types are added in mixed reality. "Trigger", also left untranslated, checks that a trigger has been activated: you designate a scene, then one of its triggers, and only Objet 3D events with both switches on are offered.
"Ligne disponible" (Line available) belongs to multiplayer routing and only appears once lines have been defined: see the next section. Both appear in the conditions table.
Bringing what appears to life
In mixed reality, the "Mode d'affichage" (Display mode) panel of a text, an image, a video, a slideshow or an instruction gains two settings specific to this kind of story, and a third one it shares with 360 stories.
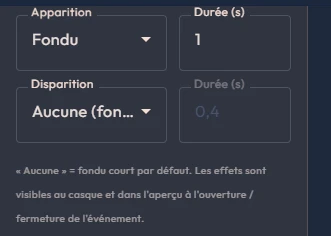
The first, "Apparition / disparition" (Appear / disappear): two lists, one for the entrance and one for the exit, each with a duration from 0.1 to 3 seconds. The effects can be copied and pasted from one event to another. The web preview only plays the appearance: the disappearance is judged in the headset.
| Effect | What it does |
|---|---|
| "Aucune (fondu court par défaut)" (None, short fade by default) | The default: a very brief, almost imperceptible fade that avoids an abrupt appearance. |
| "Fondu" (Fade) | The object reveals itself or clears in transparency, without moving. |
| "Zoom (grossit / rétrécit)" (Zoom, grows / shrinks) | The object grows from nothing, or shrinks until it disappears. |
| "Pop (zoom avec rebond)" (Pop, zoom with bounce) | The same zoom, with a slight overshoot then a return: the gesture catches the eye. |
| "Montée (naît du sol)" (Rise, born from the floor) | The object comes up out of the room floor. Suits anything that should seem to spring from the place. |
| "Descente (tombe en place)" (Fall into place) | The object arrives from above and settles. Suits a label or an information panel. |
| "Pivot (quart de tour)" (Pivot, quarter turn) | The object arrives turning a quarter turn on itself. |
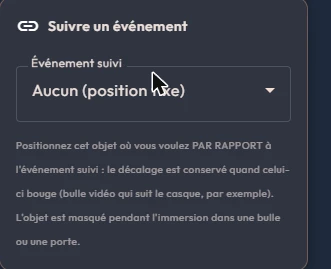
The second setting, "Suivre un évènement" (Follow an event), is in the same panel. An "Évènement suivi" (Followed event) list, set to "Aucun (position fixe)" (None, fixed position) by default, pins your event to another one: you place it where you want it relative to the one it follows, and the offset is kept when that one moves.
The typical use is the label accompanying a video bubble that follows the headset. The following object is hidden while the visitor is immersed in a bubble or a door. The web preview ignores this setting: the content stays where it is.
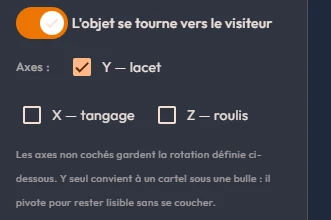
The third, "Face à la caméra" (Face the camera), also exists in 360 stories and is set the same way: a switch and three axis boxes, described in Settings shared by all events. Ticking "Y - lacet" (yaw) alone is the usual setting in mixed reality: a label under a bubble then pivots to stay readable from wherever it is looked at, without ever lying down or tipping over.
Visual effects
The Effet visuel (Visual effect) event, in the "Avancé" (Advanced) category, renders an ambient effect in the real room: water, light, mist, fire, rain or snow, particles. It is not placed on a point of the scene but on a volume, one of the zones drawn in the "Pièce" panel: the effect fills that volume. So create the zone first, name it ("Bassin", pool, for instance), then designate it in the event's "Volume porteur" (Host volume).
The effect activates automatically, on entering a zone, or on crossing a bubble or a door, never on a click. Its numeric settings can be animated over time, from the "Animation" tab. All its settings are detailed in the event catalogue.
Finding your mixed reality stories again
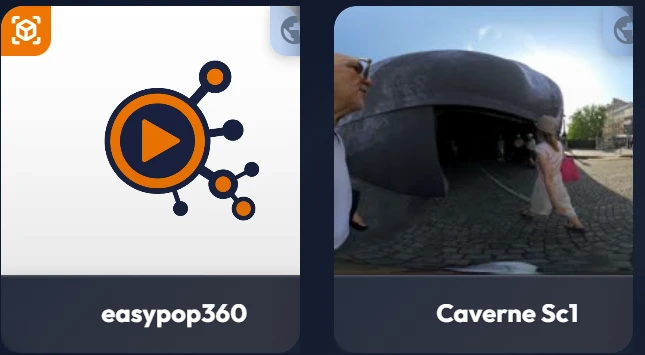
In your story list, a mixed reality story carries an icon badge in the top left of its thumbnail, whose tooltip reads "Réalité Mixte". The same badge turns up in the media list, in the story selector and in projects. A 360 story carries none: the presence of the badge is the information.
20Several visitors in the same room: the route lines
Several headsets can share the same real room, each following its own parallel route: four visitors, four side-by-side journeys, the same experience played at the same time without anyone getting in anyone's way. A route line is one of those journeys: an origin in the room and an orientation.
Lines are set in the "Lignes multi-joueurs" (Multiplayer lines) section of the "Pièce" panel, described in the previous section.
You only write the content once, on the reference line, the first in the list and the only one the preview shows. At playback, the content is offset towards the line assigned to each visitor. The other lines are not copies to be filled in: they carry only a position and an orientation. Changing the order of the list therefore changes the reference line, and moves everything else with it.
Placing the lines
The "Ajouter une ligne" (Add a line) button creates one. Each carries a Name of 30 characters at most, an Id, a Position X and a Position Z locating its origin in the room, and an "Orientation (°)" from 0 to 360 saying which way the route runs.
Authoring a scene on the reference line
At the head of the lines section sits a switch: "Scène en repère ligne" (Line-relative scene). Turn it on and this scene's content stops being placed relative to the corner of the room: it is placed relative to the line. You keep working on the reference line, and on the headset the content is offset towards the line each player chose.
When the switch is on, or when the room is linked to another scene, the list of lines is hidden and replaced by a message restating the rule: work on the reference line, the only one shown in the preview, and manage the lines from the scene that defines the room. One more consequence: in a line-relative scene the coordinate bounds turn negative, because the origin is that of the line, not the corner of the room.
Assigning a line to a visitor
That leaves deciding who takes which line. On an event's opening screen, a "Ligne à adopter (multi-joueurs)" (Line to adopt) list offers the story's lines, with "Aucune" (None) by default and a "- référence" note on the first. When the visitor fires that event, their headset adopts the given line and follows that route to the end.
The "Ligne disponible" (Line available) condition completes the mechanism: it is true as long as the designated line has been claimed by no headset.
The typical build fits in one sentence. You place four starting visuals on the floor, one per line; each carries a different "Ligne à adopter" on opening, and a "Ligne disponible" condition on that same line. The first visitor picks one, the matching visual disappears for the others, and so on until all four routes are taken.
Taking over the lines of another story
The "Pièce" panel offers two ways to reuse a room already built, detailed in the previous section: the link "Source de la pièce" (Room source) to another scene of the same story, which follows its changes, and the copy "Reprendre la pièce d'une autre story" (Take the room from another story), which does not.
For the lines, only the copy matters: its "Lignes multi-joueurs" switch decides whether the source story's lines are imported along with the room.
Values that change during the experience
Three values specific to this way of playing can be shown inside a text, using the tokens described in Dynamic tokens: the number of headsets present in the room, the visitor's own included, the route line assigned to this headset, and the device battery level. A welcome panel reading "there are three of you in the room, you are on the blue route" is composed that way, with nothing to program.